") 極客造物:簡(jiǎn)易R(shí)aspberry Pi溫濕度傳感器
極客造物:簡(jiǎn)易R(shí)aspberry Pi溫濕度傳感器
這篇文章來源于DevicePlus.com英語網(wǎng)站的翻譯稿。
目錄
1. 簡(jiǎn)介
1.1 認(rèn)識(shí)DHT22:一種溫濕度傳感器
1.2 您將要學(xué)到的內(nèi)容
2. 將您的Raspberry Pi與DHT22傳感器連接
2.1 DHT22:基本電路
2.1.1 BOM
2.1.2 啟動(dòng)!
2.2 DHT22機(jī)房環(huán)境控制器
2.2.1 BOM
2.2.2 啟動(dòng)!
1. 簡(jiǎn)介
能夠在任意環(huán)境中輕松感知環(huán)境濕度的能力非常重要,因?yàn)闈穸炔粌H會(huì)影響人的舒適度,還會(huì)影響人類機(jī)體的運(yùn)作。我們?cè)诒疚闹袑⒁褂玫碾p模傳感器非常適用于創(chuàng)客項(xiàng)目,例如改善HVAC、氣象站和物聯(lián)網(wǎng)恒溫器,尤其是與僅在Raspbian上可用的大量高質(zhì)量軟件包相結(jié)合之后。您可以在Pi(或Linux終端)上試試這個(gè):
wget  http://archive.raspbian.org/raspbian/dists/stable/main/binary-armhf/Packages.xz
-O - 2>/dev/null | xz -dfc | grep -c '^Package: '
| cut -d ' ' -f 2
等待其運(yùn)行完成。它將輸出您可以使用的軟件包數(shù)量。在撰寫本文時(shí),該存儲(chǔ)庫中有61.487個(gè)包。這個(gè)數(shù)量每天都在增加。
無論您需要什么功能,應(yīng)該都可以通過這些軟件包來實(shí)現(xiàn)。您只需要提供感知的環(huán)境數(shù)據(jù),本文第二部分中的示例將會(huì)告訴您如何獲取這些數(shù)據(jù)。
相對(duì)濕度(RH)的概念在維基百科中有很詳盡的解釋。請(qǐng)記住,相對(duì)濕度和實(shí)際濕度是兩種不同的東西,因?yàn)橄鄬?duì)濕度取決于溫度。
我們普遍感興趣的是濕度對(duì)于人類和電子設(shè)備的閾值。如果您在25C/77F左右的環(huán)境溫度下運(yùn)動(dòng),那么會(huì)在35-40% RH開始感到不適。您的電子設(shè)備,尤其是計(jì)算機(jī)系統(tǒng),在45-55% RH,溫度在20C/68F至 24C/75F之間的環(huán)境中更靈敏,且性能最佳。如果RH太低,ESD就會(huì)成為問題。如果RH太高,有局部冷凝的風(fēng)險(xiǎn)。
在冷卻理論中,有一個(gè)簡(jiǎn)單的事實(shí)經(jīng)常被忽視,即水分子是完美的小熱量桶,風(fēng)冷系統(tǒng)在45-55% RH環(huán)境中的冷卻效果會(huì)比在20% RH環(huán)境中好得多。濕度對(duì)此有所幫助。很多人沒有發(fā)現(xiàn)這一點(diǎn),而您現(xiàn)在已經(jīng)獲悉這個(gè)小技巧了。
了解了這些內(nèi)容,現(xiàn)在我們繼續(xù)討論硬件部分。
1.1 認(rèn)識(shí)DHT22:一種溫濕度傳感器
該使用什么硬件?當(dāng)然,SHT85濕度傳感器性能很好,防水等級(jí)為IP67,誤差范圍僅為±1.5% RH,但我想我們可以選擇濕度傳感器誤差范圍為±2-5% RH的設(shè)備。
DHT22有一個(gè)板載模數(shù)轉(zhuǎn)換器,因此濕度傳感器和熱敏電阻的信號(hào)清晰明了。如果沒有該功能,校驗(yàn)和的讀取會(huì)讓您十分痛苦。溫度感應(yīng)只有±0.5C的誤差,對(duì)創(chuàng)客來說性能已經(jīng)算非常好了。
五年前我買了6個(gè),每個(gè)都性能出色,即使是在戶外(雖然屏蔽了來自陽光、雨水等的紫外線)。DHT22是單總線,既不是I2C也不是SPI,雖然電壓范圍為3.3至6伏,但是絕不能用大于3.3V的電壓供電,因?yàn)檫@會(huì)導(dǎo)致其發(fā)熱,并感應(yīng)出錯(cuò)誤的溫度數(shù)據(jù)。過高的局部溫度會(huì)蒸發(fā)水分,因此局部濕度也會(huì)下降。這一點(diǎn)是完全可以避免的:直接從Raspberry Pi的3V3引腳獲取3.3V電壓,該引腳的數(shù)字為1。
在沒有運(yùn)行時(shí)的電流消耗非常低(約40uA),因此不需要任何節(jié)能功能,但如果您想要設(shè)置該功能,比如在MCU睡眠狀態(tài)期間將DHT22關(guān)閉,那么在再次想要讀取數(shù)據(jù)時(shí),需要大概1秒鐘的喚醒時(shí)間。當(dāng)開始對(duì)周圍環(huán)境進(jìn)行測(cè)量時(shí),DHT22消耗1.5-2.5mA的電流,因此電流量不會(huì)達(dá)到使用3V3引腳時(shí)建議的最大電流量50mA。
最小輪詢間隔被定義為兩秒,不過實(shí)際并不是如此。我可以以大約350毫秒的間隔進(jìn)行輪詢,大約10秒后會(huì)出現(xiàn)升溫問題—但是如果您出于某種原因需要快速讀取10次數(shù)據(jù)(取中位數(shù)?),那么在3.5秒內(nèi)就可以完成,非常好。

引腳從左到右分別是1:VCC(3V3),2:SIGNAL,3:NC(未連接),4:GND。您還需要一個(gè)從引腳2到引腳1的10kΩ上拉電阻。
當(dāng)且僅當(dāng)您遇到抖動(dòng)(通常發(fā)生在長(zhǎng)線纜電路上)狀況時(shí),需要在VCC和GND之間添加一個(gè)100nF電容。
1.2 您將要學(xué)到的內(nèi)容
學(xué)習(xí)完本文內(nèi)容后,您將能夠輕松感知相對(duì)溫度和濕度。我添加了一些輔助函數(shù),使您無需谷歌工具就可以將完成“攝氏度”和“華氏度”之間的轉(zhuǎn)換。每次都手動(dòng)轉(zhuǎn)換會(huì)比較麻煩。為了您的方便,我們添加兩個(gè)小的輔助函數(shù):
# Celsius to fahrenheit: F = ( C * 1.8 ) + 32
def celsius2fahrenheit( _celsius ):
  _fahrenheit = ( "%.2f" % (( _celsius * 1.8 ) + 32) )
  return float( _fahrenheit )

# Fahrenheit to celsius: C = ( F - 32 ) * 5/9
def fahrenheit2celsius( _fahrenheit ):
  _celsius = ( "%.2f" % (( _fahrenheit - 32 ) * 5/9 ))
  return float( _celsius )
在第二部分的dht22_simple.py和dht22_actionable.py中也有這兩個(gè)函數(shù)。
在我們研究DHT22的過程中,將會(huì)深入探索“DHT22機(jī)房環(huán)境控制器”或DCREC的構(gòu)建和操作,該器件能夠?qū)鞲衅鲾?shù)據(jù)進(jìn)行響應(yīng)。您可以將dht22_actionable.py作為濕度項(xiàng)目的模板(基于DHT22),如果您具備了硬件和安裝技能,就可以完成幾乎所有的工作了。閱讀完python腳本后,您也將會(huì)掌握GPIO輸出控制。
2. 將您的Raspberry Pi與DHT22傳感器連接
DHT22非常易于使用。此處無需處理I2C總線,它是I/O的一個(gè)數(shù)據(jù)引腳,是一種半雙工總線,也許您對(duì)這個(gè)術(shù)語更熟悉。
您可以從技術(shù)規(guī)格書 獲取有關(guān)脈沖長(zhǎng)度、間隔等信息,但如果您想馬上開始,請(qǐng)首先按照此Raspberry Pi設(shè)置指南確保您的Pi已準(zhǔn)備就緒。
準(zhǔn)備好后,將下面的腳本復(fù)制粘貼到您的Raspberry Pi GUI編輯器中(聽說Pluma很好用),并將文件保存為“rpi_prepare.sh”。
[ begin rpi_prepare.sh ]
#! /usr/bin/env bash
set -eu -o pipefail


export DEBIAN_FRONTEND DEBIAN_PRIORITY DEBCONF_NOWARNINGS

_pkg_list="pigpio wiringpi python-rpi.gpio
python3-rpi.gpio rpi.gpio-common git python-gpiozero
python-gpiozero-doc python3-gpiozero python-setuptools-git python3-setuptools-git python3-dev python3-pip"

# Upgrade system and installed packages - uncomment where
# relevant
sudo apt update || ech o failed to update index list
#sudo dpkg --configure -a || ech o failed to fix interrupted
upgrades
#sudo apt --fix-broken --fix-missing install || ech o failed
to fix conflicts
#sudo apt -y --allow-downgrades --fix-broken --fix-missing
#dist-upgrade

# Install $_pkg_list
sudo apt update
sudo apt-get -y install $_pkg_list

# Make 'pip3' bigly fresh? Yes.
sudo python3 -m pip --upgrade pip setuptools wheel
# Get Adafruit_DHT Python library
sudo pip3 install Adafruit_DHT

read -p "[?] Reboot? y/N: " _foo
if [ X"$_foo" = X"y" -o X"$_foo" = X"Y" ]
then
  ech o "[!] Rebooting in 5 seconds, CTRL+C to abort ..."
  for i in $( seq 1 5 ) ; do ech o -n . ; sleep 1 ; done ; ech o
  sudo reboot
fi
[ end rpi_prepare.sh ]
該腳本用于安裝和更新Python3的“pip3”程序,以及安裝一些有用的GPIO軟件。將其復(fù)制到Pi后,使用以下命令運(yùn)行:
bash rpi_prepare.sh
2.1.1 BOM
| Raspberry Pi 4 | https://www.newark.com/raspberry-pi/rpi4-modbp-4gb/raspberry-pi-4-model-b-4gb-rohs/dp/02AH3164 |
| DHT22 傳感器 | https://www.newark.com/mcm/83-17985/dht22-temp-humidity-sensor/dp/32AC9951 |
| 10kΩ 電阻 | https://www.newark.com/multicomp-pro/mccfr0w4j0103a50/carbon-film-resistor-10kohm-250mw/dp/58K5002 |
| 杜邦電線 | https://www.newark.com/adafruit/824/wire-gauge-28awg/dp/88W2794 |
| 面包板 | https://www.newark.com/mcm/21-19082/breadboardjumper-kit-with-binding/dp/79X3995 |
2.1.2 啟動(dòng)!
將它們?nèi)窟B接起來,這一步很簡(jiǎn)單,請(qǐng)按照以下圖示進(jìn)行連接。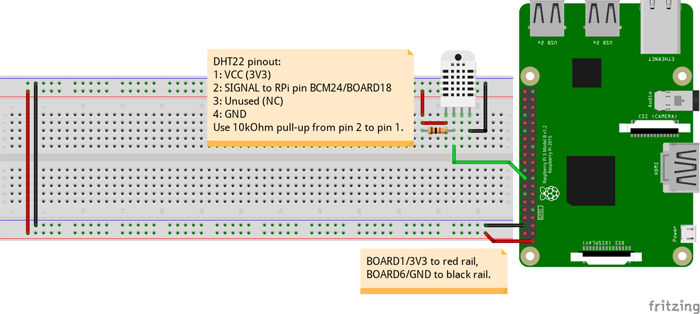
首先,將DHT22放在面包板上,并在引腳1和引腳2之間添加10kΩ上拉電阻。然后將BOARD1/3V3連接到面包板上的紅色導(dǎo)軌,BOARD6/GND連接到黑色導(dǎo)軌,將BCM24/BOARD18連接到DHT22上的引腳2。現(xiàn)在,用一根導(dǎo)線從紅色導(dǎo)軌連接到DHT22的引腳1,用另一根導(dǎo)線從黑色導(dǎo)軌連接到引腳4。然后將以下腳本復(fù)制粘貼到您的Pi終端:
#! /usr/bin/env python3
# Demonstrate reading DHT22 sensor using the
# Adafruit_DHT library
# DHT22 pinout (left to right):
# 1: VCC(3.3-6V)
# 2: SIGNAL
# 3: UNUSED
# 4: GND
# Notes:
# - 10kOhm pull-up resistor from SIG to VCC.
# - Use 3V3 for VCC, or the DHT22 will heat up.
# - Indentation: 2 whitespaces per level, no tabs.
import Adafruit_DHT
from time import sleep
p=print # Alias
# Note: Use >=2000ms polling intervals
_poll_interval = 2 # Seconds
_dht_pin = 24 # BCM24/BOARD18
_dht = Adafruit_DHT.DHT22

def celsius2fahrenheit( _celsius ):
  _fahrenheit = ( "%.1f" % (( _celsius * 1.8 ) + 32) )
  return float( _fahrenheit )

def fahrenheit2celsius( _fahrenheit ):
  _celsius = ( "%.1f" % (( _fahrenheit - 32 ) * 5/9 ))
  return float( _celsius )

if __name__ == '__main__':
  while True:
    ( _humidity, _celsius ) = Adafruit_DHT.read_retry( _dht, _dht_pin )
    p( "Humidity => %.1f%% RH" % _humidity )
    p( "Temperature => %.2fF" % celsius2fahrenheit( _celsius ), end='/' )
    p( "%.2fC" % _celsius )
    sleep( _poll_interval )
[ end dht22_simple.py ]
輸出應(yīng)如下所示。如果沒有輸出任何內(nèi)容,您可能遇到了運(yùn)行超時(shí)的問題。這種情況有時(shí)候會(huì)發(fā)生,但是是不應(yīng)該會(huì)發(fā)生的。按下CTRL+C中斷程序,并檢查所有連接是否正確。
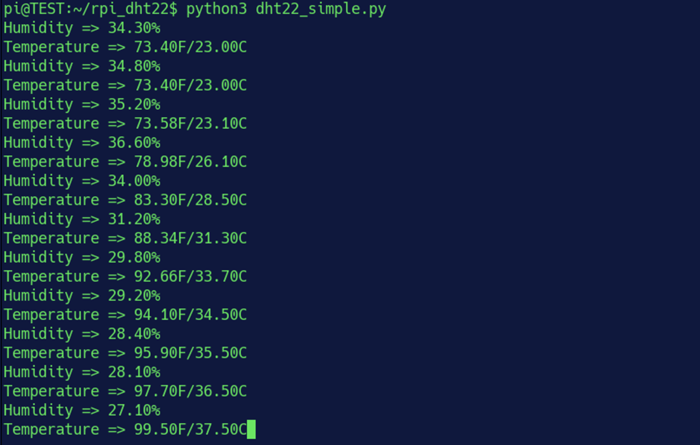
在截圖的執(zhí)行過程中,我將熱風(fēng)槍的噴嘴輕輕靠近DHT22,同時(shí)用紅外溫度計(jì)測(cè)量DHT22。這兩個(gè)讀數(shù)可以彼此驗(yàn)證,以保證實(shí)驗(yàn)的嚴(yán)謹(jǐn)性。
2.2 DHT22 機(jī)房控制器
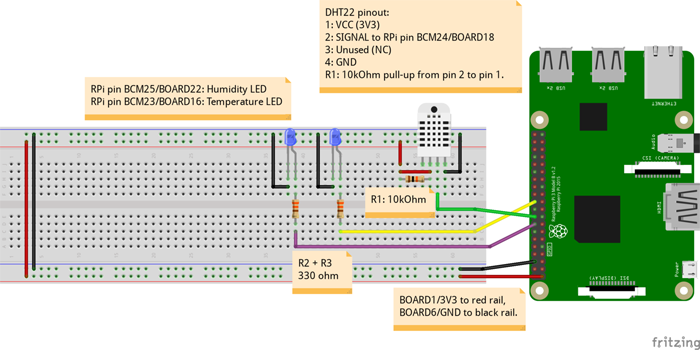
現(xiàn)在,我們將做一些比僅僅通過濕度傳感器和熱敏電阻感知環(huán)境更有趣的事情—制作DHT22機(jī)房環(huán)境控制器。在閱讀下面的dht22_actionable.py之前,需要對(duì)其操作進(jìn)行簡(jiǎn)短的解釋。我們?cè)O(shè)置兩個(gè)Raspberry Pi GPIO引腳作為輸出(BCM25/BOARD22和BCM23/BOARD16),建立與DHT22傳感器的連接,然后我們循環(huán)幾個(gè)條件語句來檢查所處環(huán)境是否滿足公認(rèn)的“適于計(jì)算的最佳濕度和溫度條件”。
每當(dāng)濕度或溫度超出范圍時(shí),_humidity_led或_temperature_led都會(huì)亮起。但它也可以用于驅(qū)動(dòng)電路,例如IRLZ24N MOSFET或繼電器驅(qū)動(dòng)電路。您可以利用自己現(xiàn)有的設(shè)備來實(shí)現(xiàn)所有這些功能。
準(zhǔn)備好所有的元器件,如果有缺少的東西,請(qǐng)?jiān)L問下文BOM中的連接。
2.2.1 BOM
| Raspberry Pi 4 | https://www.newark.com/raspberry-pi/rpi4-modbp-4gb/raspberry-pi-4-model-b-4gb-rohs/dp/02AH3164 |
| DHT22 傳感器 | https://www.newark.com/mcm/83-17985/dht22-temp-humidity-sensor/dp/32AC9951 |
| 2x ROHM SLR343BC4TT32 3mm LED | https://www.infinite-electronic.hk/product/LAPIS-Semiconductor_SLR343BC4TT32.aspx |
| 杜邦電線 | https://www.newark.com/adafruit/824/wire-gauge-28awg/dp/88W2794 |
| 面包板 | https://www.newark.com/mcm/21-19082/breadboardjumper-kit-with-binding/dp/79X3995 |
| 10kΩ 電阻 | https://www.newark.com/multicomp-pro/mccfr0w4j0103a50/carbon-film-resistor-10kohm-250mw/dp/58K5002 |
| 2x 330Ω 電阻 | https://www.newark.com/multicomp-pro/mccfr0w4j0331a50/carbon-film-resistor-330-ohm-250mw/dp/58K5042 |
2.2.2 啟動(dòng)!
如下圖所示完成所有連接。保留上次Raspberry Pi GPIO BCM25/BOARD22和BCM23/BOARD16的引腳連接,3V3/BOARD1和GND/BOARD6的連接和上次相同。在您的Pi準(zhǔn)備好運(yùn)行程序之前不要給電路通電,在此之前仔細(xì)檢查所有連接。確認(rèn)沒有任何問題后,通電并執(zhí)行下文中的dht22_actionable.py。
python3 dht22_actionable.py
[ begin dht22_actionable.py ]
#! /usr/bin/env python3
# Install prerequisite packages & Adafruit_DHT library
"""
#! /bin/sh
_pkg_list='python3-setuptools python3-pip python3-dev python3-rpi.gpio'
sudo apt-get -y install $_pkg_list
sudo python3 -m pip --upgrade pip setuptools wheel
sudo pip3 install Adafruit_DHT
"""
#
# Ensure operating conditions in a
# datacenter (your basement) are
# within SAFE OPERATING HUMIDITY- AND
# TEMPERATURE THRESHOLDS FOR OPTIMAL
# COMPUTING CONDITIONS.
#
# Will fire BCM25/BOARD22 if humidity is
# out of bounds, and BCM23/BOARD16 if
# temperature is out of bounds.
#
# Uses RPi.GPIO Adafruit_DHT library,
# tested on Raspbian, Dec. 2019
#
# DHT22 pinout (left to right):
# 1: VCC(3.3-6V)
# 2: SIGNAL
# 3: UNUSED
# 4: GND
# Notes:
# - 10kOhm pull-up resistor from SIG to VCC.
# - 330ohm resistors in series with RPi
#   GPIO pins and ROHM SLR343BC4TT32
#   3mm LEDs.
# - Use 3V3 for VCC, or the DHT22 will
#   heat up.
# - Indentation: 2 whitespaces per level, no
#   tabs.
import Adafruit_DHT
from time import sleep
import RPi.GPIO as GPIO
import atexit
GPIO.setwarnings( True )
# Use BCM pin numbering instead of BOARD
GPIO.setmode( GPIO.BCM )
_humidity_led = 25 # BCM25/BOARD22
_humidity_lower_threshold = 45.0
_humidity_upper_threshold = 55.0
_temperature_led = 23 # BCM23/BOARD16
_temperature_lower_threshold = 20.0 # 20C/68F
_temperature_upper_threshold = 24.0 # 24C/75F
_poll_interval = 2 # Use intervals >=2secs
_dht_pin = 24 # BCM24/BOARD18
_dht = Adafruit_DHT.DHT22
_debug = True
p=print # Alias

if _debug:
  p( "[!] Setting up pin BCM_%i as OUTPUT for humidity LED ..." % _humidity_led )
  p( "[!] Setting up pin BCM_%i as OUTPUT for temperature LED ..." %  _temperature_led )

GPIO.setup( _humidity_led, GPIO.OUT )
GPIO.setup( _temperature_led, GPIO.OUT )

def exit_cleanly():
  print( "[!] Cleaning up and exiting ..." )
  GPIO.setwarnings( False )
  GPIO.cleanup()
  exit()

def celsius2fahrenheit( _celsius ):
  _fahrenheit = ( "%.1f" % (( _celsius * 1.8 ) + 32) )
  return float( _fahrenheit )

def fahrenheit2celsius( _fahrenheit ):
  _celsius = ( "%.1f" % (( _fahrenheit - 32 ) * 5/9 ))
  return float( _celsius )

# Call exit_cleanly on normal exit and CTRL+C/KeyboardInterrupt/foo
atexit.register( exit_cleanly )

if __name__ == '__main__':
  while True:
	( _humidity, _celsius ) = Adafruit_DHT.read_retry( _dht,
        _dht_pin )
	if _debug:
  	p( "[+] Humidity => %.1f%% RH" % _humidity )
  	p( "[+] Temperature => %.1fC" % _celsius, end='/' )
  	p( "%.1fF" % celsius2fahrenheit( _celsius ) )
	# Let's be neat
	_humidity = float( "%.1f" % _humidity )
	_celsius = float( "%.1f" % _celsius )
	# Humidity too high?
	if _humidity > _humidity_upper_threshold:
  	p(
        "[!] Humidity %.1f%% RH exceeds upper threshold value of %.1f%% RH" %
        ( _humidity, _humidity_upper_threshold ) )
  	# Take decisive action!
  	GPIO.output( _humidity_led, 1 )
	# Humidity too low?
	elif _humidity < _humidity_lower_threshold:
  	p(
        "[!] Humidity %.1f%% RH is below lower threshold value of %.1f%% RH" %
         ( _humidity, _humidity_lower_threshold ) )
  	# Take decisive action!
  	GPIO.output( _humidity_led, 1 )
	# Safe operating humidity?
	elif _humidity <= _humidity_upper_threshold and _humidity >= _humidity_lower_threshold:
  	GPIO.output( _humidity_led, 0 )
  	# Safe!

	# Temperature too high?
	if _celsius > _temperature_upper_threshold:
  	p( "[!] Temperature %.1fC/%.1fF exceeds upper threshold value of %.1fC/%.1fF" %
  	( _celsius, celsius2fahrenheit( _celsius ), _temperature_upper_threshold,
  	celsius2fahrenheit( _temperature_upper_threshold ) ) )
  	# Take decisive action!
  	GPIO.output( _temperature_led, 1 )
	# Temperature too low?
	elif _celsius < _temperature_lower_threshold:
  	p( "[!] Temperature %1.fC/%.1fF is below lower threshold value of %.1fC/%.1fF" %
  	( _celsius, celsius2fahrenheit( _celsius ), _temperature_lower_threshold,
  	celsius2fahrenheit( _temperature_lower_threshold ) ) )
  	# Take decisive action!
  	GPIO.output( _temperature_led, 1 )
	# Safe operating temperature?
	elif _celsius <= _temperature_upper_threshold and _celsius >= _temperature_lower_threshold:
  	GPIO.output( _temperature_led, 0 )
  	# Safe!

	sl eep( _poll_interval )
[ end dht22_actionable.py ]
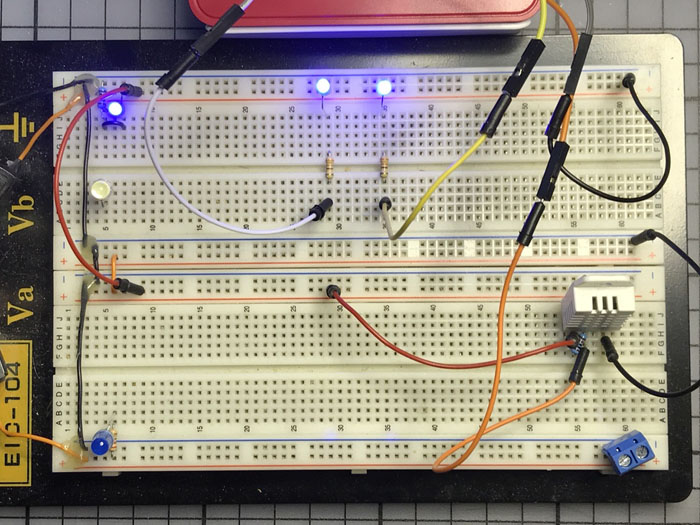
您的輸出不應(yīng)和下圖中我的終端輸出內(nèi)容相同。將450C/842F的熱風(fēng)槍吹過一個(gè)裝滿水的小金屬碗,以驗(yàn)證DHT22機(jī)房環(huán)境控制器(DCREC)已經(jīng)功能正常。在您的應(yīng)用中,請(qǐng)確保GPIO引腳連接到了一些完好的應(yīng)用模塊,例如MOSFET驅(qū)動(dòng)繼電器或雙擴(kuò)音器。現(xiàn)在開始行動(dòng)吧!
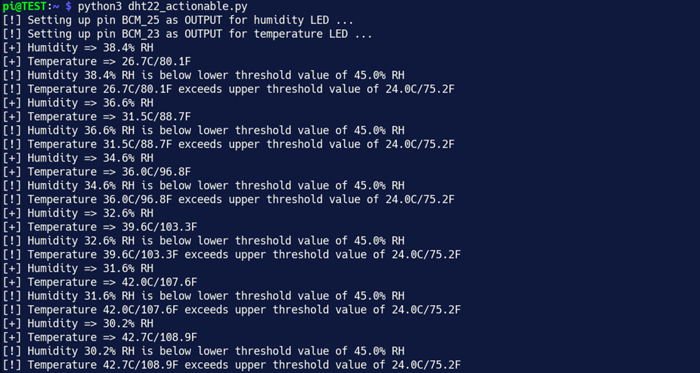
您可以在下圖中看到我的面包板。在右下角,DHT22正在運(yùn)行,它會(huì)以數(shù)字的形式向我的Raspberry Pi報(bào)告。在頂部中間,兩個(gè)LED亮起,警告我的桌面計(jì)算環(huán)境不在最佳操作范圍內(nèi)。
我對(duì)此感到非常意外和震驚。

Lasse Efrayim Jespersen
Lasse出生于以色列,后移居到緯度較冷的地區(qū)。出于個(gè)人天然的興趣愛好,他一步步走近了直接的Perl、高效的C/C++、以及優(yōu)雅的MicroPython。他非常喜歡用ESP8266/ESP32/Raspberry Pi和Arduino來構(gòu)建機(jī)器。
審核編輯黃宇
-
傳感器
+關(guān)注
關(guān)注
2564文章
52707瀏覽量
764640 -
Raspberry Pi
+關(guān)注
關(guān)注
2文章
620瀏覽量
22982
發(fā)布評(píng)論請(qǐng)先 登錄
溫濕度傳感器:核心原理與跨領(lǐng)域應(yīng)用解析
溫濕度傳感器:生活中的“小氣候?qū)<摇?/a>
NB溫濕度傳感器:無線傳輸,便捷安裝
溫濕度控制器的功能和應(yīng)用
溫濕度傳感器種類及原理的優(yōu)劣分析
溫濕度傳感器是什么類型的傳感器
dht11溫濕度傳感器工作原理介紹
車載溫濕度傳感器有什么功能
溫濕度傳感器怎么調(diào)試
溫濕度傳感器技術(shù)參數(shù)有哪些
LORA溫濕度傳感器的功能特點(diǎn)
溫濕度監(jiān)測(cè)系統(tǒng)應(yīng)用
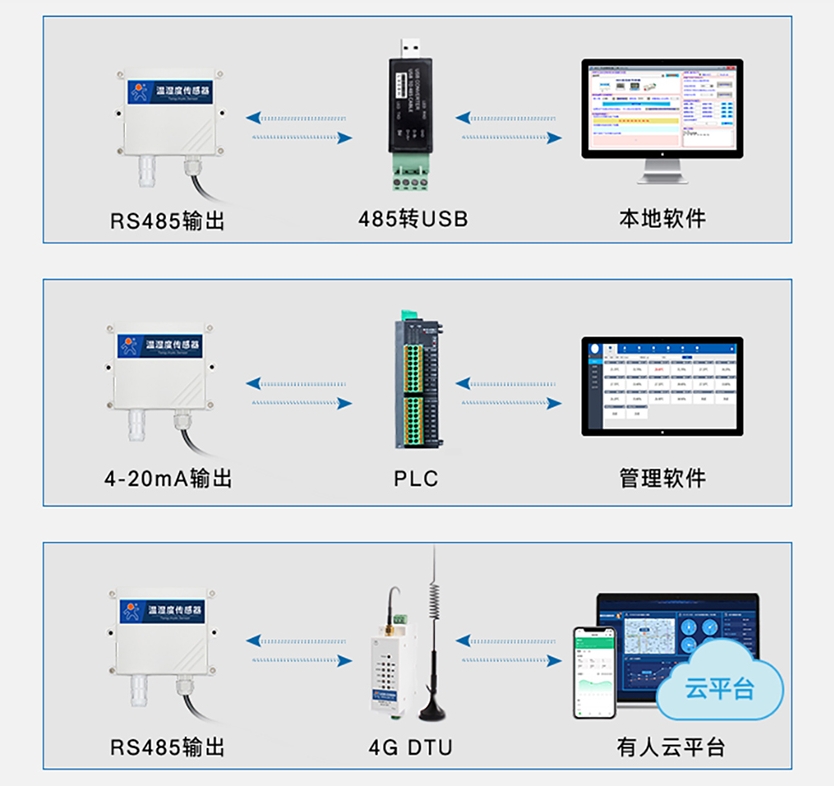
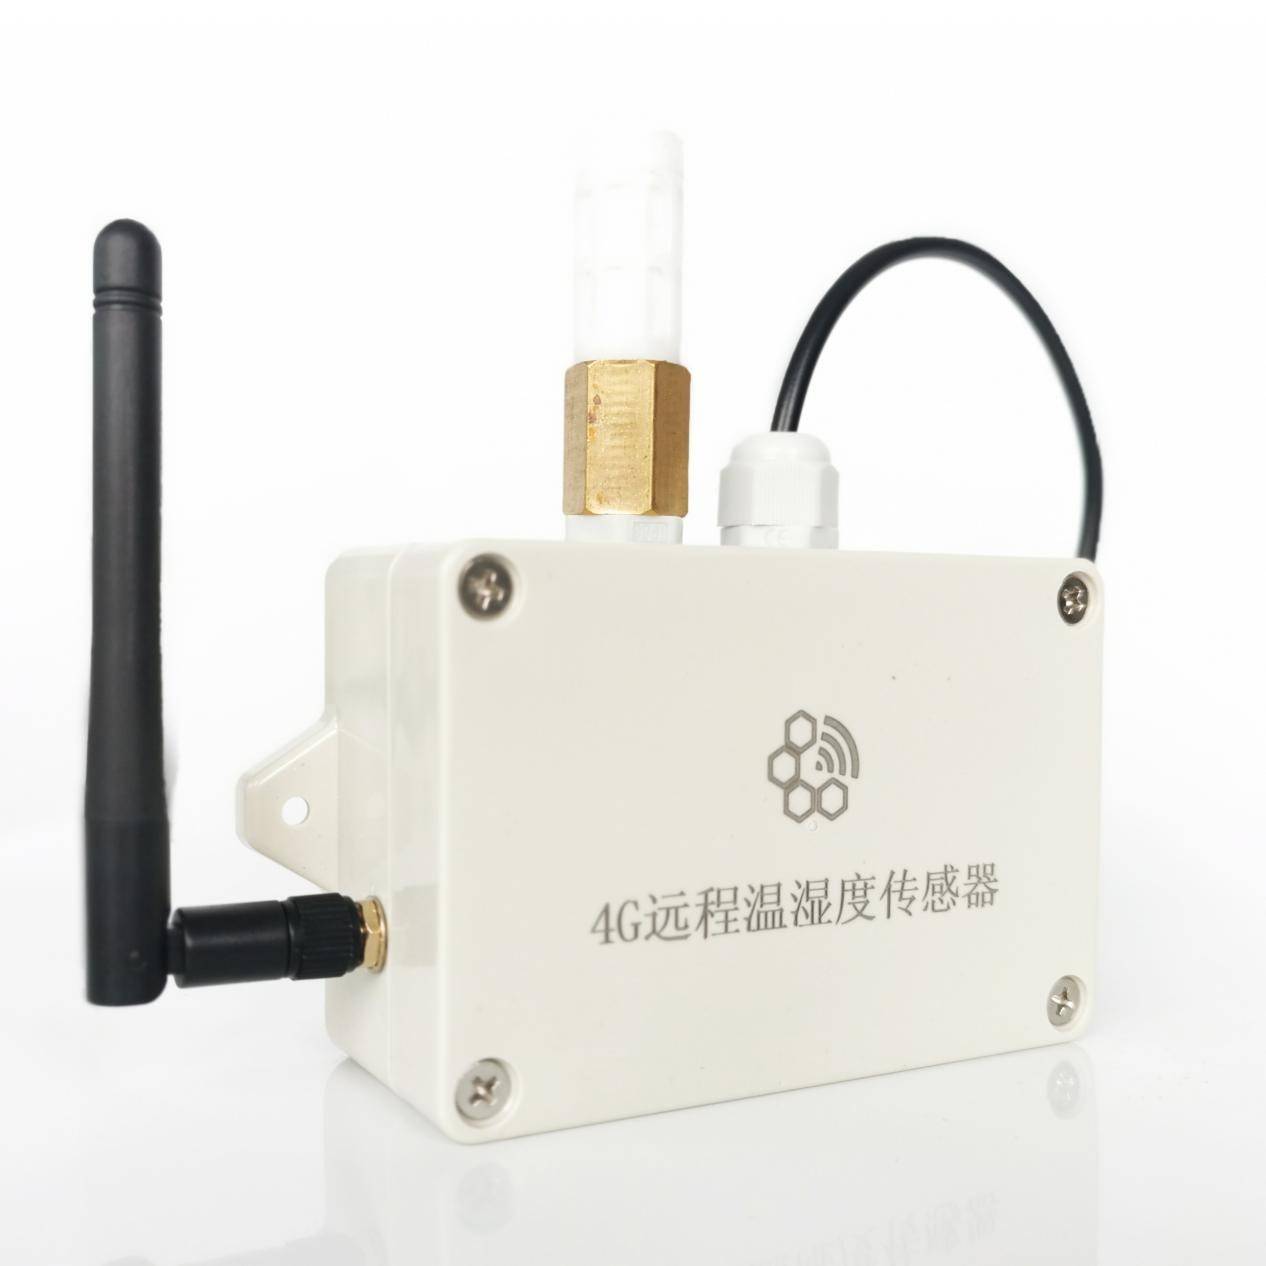
蜂窩物聯(lián)4G溫濕度傳感器如何助力現(xiàn)代農(nóng)業(yè)?


 工商網(wǎng)監(jiān)
評(píng)論