 電子發(fā)燒友App


 創(chuàng)作
 發(fā)文章
 發(fā)帖
  提問
提問  發(fā)資料
 發(fā)視頻
資料介紹
PCB圖如下:
成分
| 針排接頭公 - 母 1x40 2.54mm | × 1 |
| 公排針 | × 2 |
| L293d驅(qū)動IC | × 1 |
| DIP 插座 28/16 針 | × 1 |
| 2Pin 螺絲端子 5mm 間距 | × 3 |
|
電阻封裝 PCBway |
× 1 |
|
開關(guān)套件通孔 PCBway |
× 1 |
|
LED 套件。 PCBway |
× 1 |
|
單刀雙擲 DIYhz商店 |
× 1 |
描述
Bit-Duino 一體式機器人防護(hù)罩
這個 Arduino Uno 開發(fā)板是為初學(xué)者設(shè)計的,他們可以嘗試使用參考代碼進(jìn)行自我編程。他們可以輕松地使用參考代碼并創(chuàng)建他們的項目!使用它,您可以控制兩個電機和兩個伺服電機。你的想象力是你唯一的限制!使用它,您可以學(xué)習(xí)如何使用一些傳感器,并且可以從頭開始創(chuàng)建自己的項目!
如何給盾牌加電。
您可以使用任何類型的電池,這是您的選擇。確保它們位于電池外殼中,并且有兩根電線分別為負(fù)極和正極。螺釘端子在這里用作連接器。
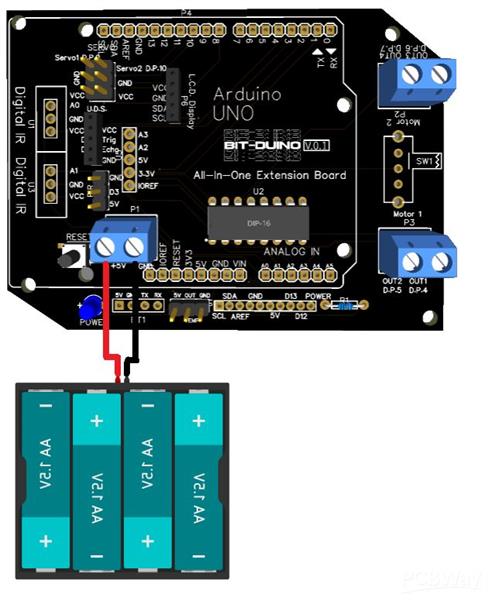
工作電壓 - 7 至 9V
連接傳感器和模塊。
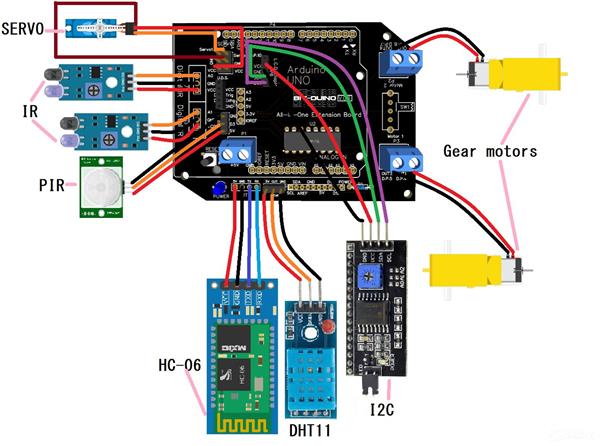
讓我們了解每個組件以及它們的用途,
L293D IC - 用于控制兩個電機。
LED -作為電源指示燈。
1k 電阻- 降低 LED 的電壓和電流
公針頭 -要將屏蔽連接到 Arduino,連接伺服電機,并連接傳感器。
母針頭- 連接傳感器,連接額外的針腳。
SPDT 開關(guān)- 打開/關(guān)閉屏蔽。
按鈕 -重置代碼。
螺絲端子- 連接電源線,連接輸出電機線。
參考代碼'
代碼隨#define 和伺服庫一起提供。
?
#include#define motor1 4 #define motor2 5 #define motor3 6 #define motor4 7 伺服.servo1; 伺服.servo2; #define tx 0 #define rx 1 #define trig 2 #define echo 8 #define pir_out 3 #define temp 11 #define ir1 A0 #define ir2 A1 #define sda A4 #define scl A5 void setup () { ? //把你的設(shè)置代碼在這里,運行一次: ?servo1.attach( 9 ); ?伺服2.attach(10); } void loop () { ? // 把你的主要代碼放在這里,重復(fù)運行: }
?
如果您想控制伺服電機,請將其放入格式和每個程序中。
?
#include <伺服.h>
伺服.servo1;
伺服.servo2;
void  setup ()  {
? // 把你的設(shè)置代碼放在這里,運行一次:
?servo1.attach( 9 );
?伺服2.attach(10);

}

void  loop ()  {
? // 把你的主要代碼放在這里,重復(fù)運行:

}
?
電機控制代碼。
?
#define motor1 4
#define motor2 5
#define motor3 6
#define motor4 7
#define tx 0
#define rx 1
#define trig 2
#define echo 8
#define pir_out 3
#define temp 11
#define ir1 A0
#define ir2 A1
#define sda A4
#define scl A5
void  setup ()  {
? // 把你的設(shè)置代碼放在這里,運行一次:
pinMode(電機1,輸出)
pinMode(電機2,輸出)
pinMode(電機3,輸出)
pinMode(motor4,OUTPUT)//告訴arduino電機引腳是輸出/它們是控制引腳。
}

void  loop ()  {
? // 把你的主要代碼放在這里,重復(fù)運行:
?//1st motor forward/backward code
數(shù)字寫入(電機1,高)
digitalWrite(motor2,LOW)//沿一個方向運行第一個電機(將電機連接到螺釘端子并查看它的旋轉(zhuǎn)位置,如果向前旋轉(zhuǎn)則向前旋轉(zhuǎn),如果向后旋轉(zhuǎn)則向后旋轉(zhuǎn))

數(shù)字寫入(電機 1,低)
digitalWrite(motor2,HIGH)//根據(jù)上面的代碼以相反的方向運行第一個電機。
//

//第二個電機前進(jìn)/后退代碼
數(shù)字寫入(電機 3,高)
digitalWrite(motor4,LOW)//沿一個方向運行第二個電機(將電機連接到螺釘端子并查看它的旋轉(zhuǎn)位置,如果向前旋轉(zhuǎn)則向前旋轉(zhuǎn),如果向后旋轉(zhuǎn)則向后旋轉(zhuǎn))

數(shù)字寫入(電機 3,低)
digitalWrite(motor4,HIGH)//根據(jù)上面的代碼以相反的方向運行第二個電機。
//

//第一個電機停止代碼
數(shù)字寫入(電機 1,低)
digitalWrite(motor2, LOW) //停止第一個電機。
//

//第二個電機停止代碼
數(shù)字寫入(電機 3,低)
digitalWrite(motor4, LOW) //停止第二個電機。
//

//要轉(zhuǎn)彎,你應(yīng)該讓一個輪子停止和一個運行,然后記錄它的轉(zhuǎn)彎位置。然后你可以創(chuàng)建一個名為“turn *the side turn*”的函數(shù)并在你的項目中使用它。使功能向前(所有兩個輪子都向前運行),向后(所有兩個輪子都向后運行),停止(所有兩個輪子都停止)并在您的項目中使用它們。
}
?
超聲波距離傳感器代碼
?
#define motor1 4
#define motor2 5
#define motor3 6
#define motor4 7
#define tx 0
#define rx 1
#define trig 2
#define echo 8
#define pir_out 3
#define temp 11
#define ir1 A0
#define ir2 A1
#define sda A4
#define scl A5
void  setup ()  {
? // 把你的設(shè)置代碼放在這里,運行一次:
pinMode(trig,OUTPUT); //設(shè)置引腳觸發(fā)輸出
pinMode(echo,INPUT); //設(shè)置pin echo到輸入
}

void  loop ()  {
? // 把你的主要代碼放在這里,重復(fù)運行:
?數(shù)字寫入(觸發(fā),低);
?延遲微秒(2);
?數(shù)字寫入(觸發(fā),高);
?延遲微秒(2);
?數(shù)字寫入(觸發(fā),低);
長t = 脈沖輸入(回聲,高);// 啟動傳感器

長英寸 = t / 74 / 2 ;
長cm = t / 29 / 2 ; // 獲取實際的 in/cm 值

if (cm< 10 ){
? //如果傳感器檢測到距離它不到 10cm 的物體*sensor*,則無論您在此處編寫什么程序都會運行。可以將上面的“<”替換為任意符號,使其為“小于”、“等于”、“等于或小于”或“等于或大于”。
}

}?
?
PIR 傳感器代碼
?
#define motor1 4
#define motor2 5
#define motor3 6
#define motor4 7
#define tx 0
#define rx 1
#define trig 2
#define echo 8
#define pir_out 3
#define temp 11
#define ir1 A0
#define ir2 A1
#define sda A4
#define scl A5
void  setup ()  {
? // 把你的設(shè)置代碼放在這里,運行一次:
?pinMode(pir_out,輸入);
}

void  loop ()  {
? // 把你的主要代碼放在這里,重復(fù)運行:
int val = digitalRead(pir_out);

if (val == 1 ){
? //在這里放一個函數(shù),當(dāng)傳感器檢測到運動時它將運行。
}
if (val == 0 ){
? //在這里放一個函數(shù),當(dāng)傳感器沒有檢測到任何運動時它就會運行。
}
}
?
HC-05/HC-06藍(lán)牙模塊代碼(存收號)
?
字符;
#define motor1 4
#define motor2 5
#define motor3 6
#define motor4 7
#define tx 0
#define rx 1
#define trig 2
#define echo 8
#define pir_out 3
#define temp 11
#define ir1 A0
#define ir2 A1
#define sda A4
#define scl A5
void  setup () {
? // 把你的設(shè)置代碼放在這里,運行一次:
Serial.begin( 9600 );
}

void  loop () {
? // 把你的主要代碼放在這里,重復(fù)運行:
if (Serial.available()){
?ble = Serial.read();
??
}
if (ble == ' //你要通過藍(lán)牙發(fā)送的任何數(shù)字' ){
? //當(dāng)藍(lán)牙模塊檢測到給定的數(shù)字時,你在這里編碼的任何東西都會運行。僅支持?jǐn)?shù)字,需要智能手機發(fā)送信號。您可以使用任何 android Arduino 藍(lán)牙控制應(yīng)用程序并使用下面的代碼測試信號。請記住在上傳代碼時刪除藍(lán)牙模塊并在上傳完成后重新連接。否則代碼不會上傳,否則會嚴(yán)重?fù)p壞您的藍(lán)牙模塊。?
}
}
?
要通過藍(lán)牙存儲和接收字符,請訪問https://forum.arduino.cc/t/receiving-text-strings-over-bluetooth/232452
有關(guān)其他傳感器代碼,請訪問https://forum.arduino.cc
如果您是 Arduino 編程的初學(xué)者,請訪問https://www.arduino.cc/en/Guide/
始終使用“#define 和伺服庫”。當(dāng)你用這個構(gòu)建一些東西時的代碼。
我為什么做這個?
我這樣做是因為當(dāng)我還是初學(xué)者時,我很難使用其他類型的電機控制器。所以問題是,
做大項目時總是忘記別針。
很多將 Arduino 連接到傳感器的電線非常混亂。
沒有專用的傳感器連接器。
沒有內(nèi)置開關(guān),這總是意味著要在外部連接一個。
所以在這個板上,我已經(jīng)消除了所有這些問題。
我可以用這個板做什么樣的項目?
各種項目!喜歡
避障車
線跟車
運動感應(yīng)自動皂液器等等!想象力是你唯一的限制!
需要注意的是,
焊接時,將 Arduino Uno 公針焊接在 PCB 下方,以便它們可以用作屏蔽。例如:-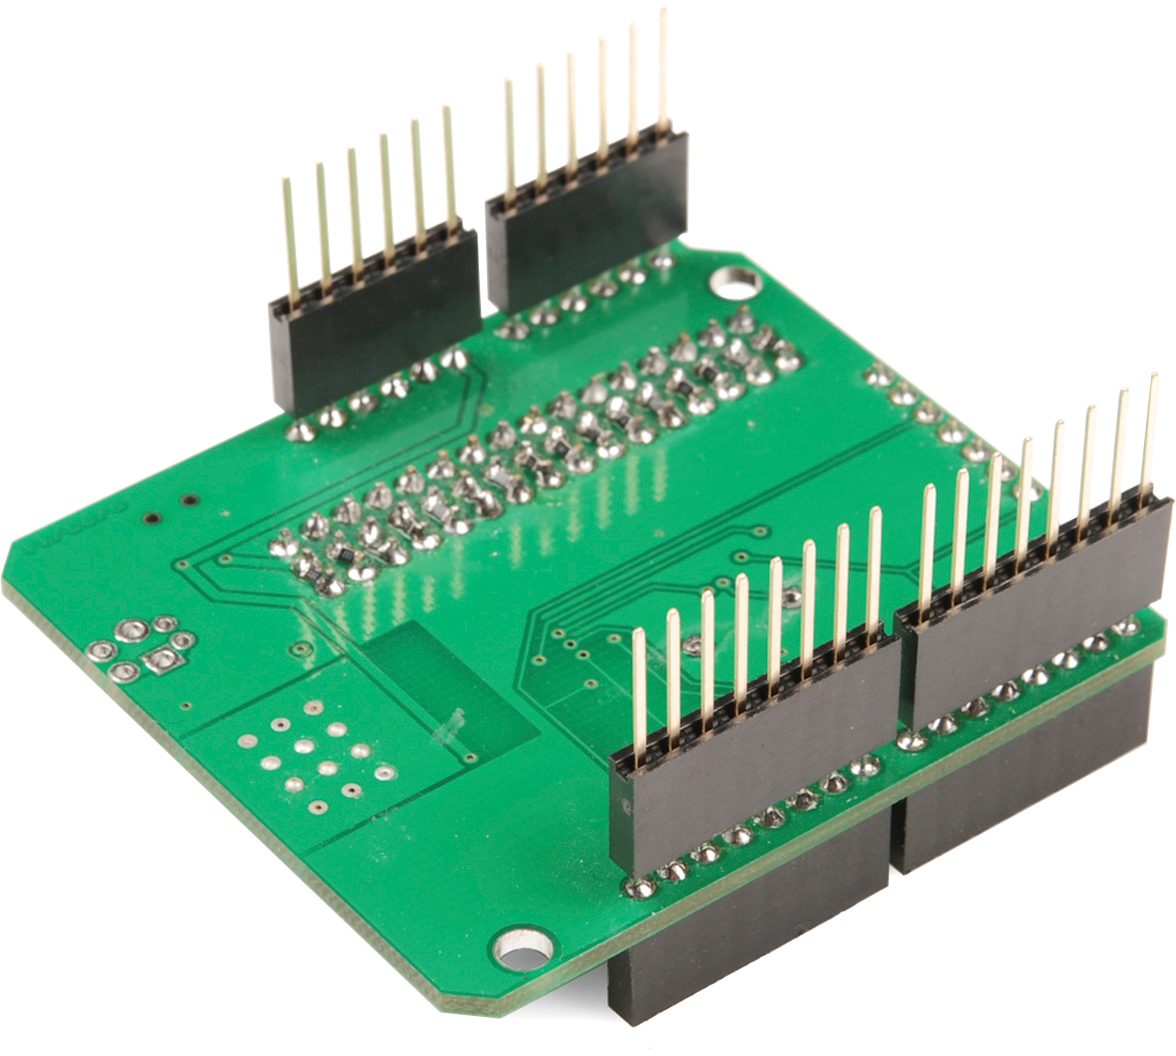
您應(yīng)該知道如何對 Arduino Uno 進(jìn)行編程(例如:制作一個函數(shù))
您可以選擇將傳感器和模塊引腳與母頭/公頭連接。
焊接元件后,剪掉多余的部分。
如果您想更換 IC,請使用 IC 插座底座
不得轉(zhuǎn)載,僅用于您的工作。
DP 代表 DigitalPin
溫度傳感器輸出 DP 為 11
TEMP代表溫度傳感器(DHT11模塊)
UDS代表超聲波距離傳感器
BT1代表藍(lán)牙模塊(兼容HC-05、HC-06 4pin模塊)
數(shù)字紅外是一種紅外傳感器。
PIR 是被動紅外傳感器/運動傳感器。
使用 LCD 顯示模塊時使用 I2C 轉(zhuǎn)換器。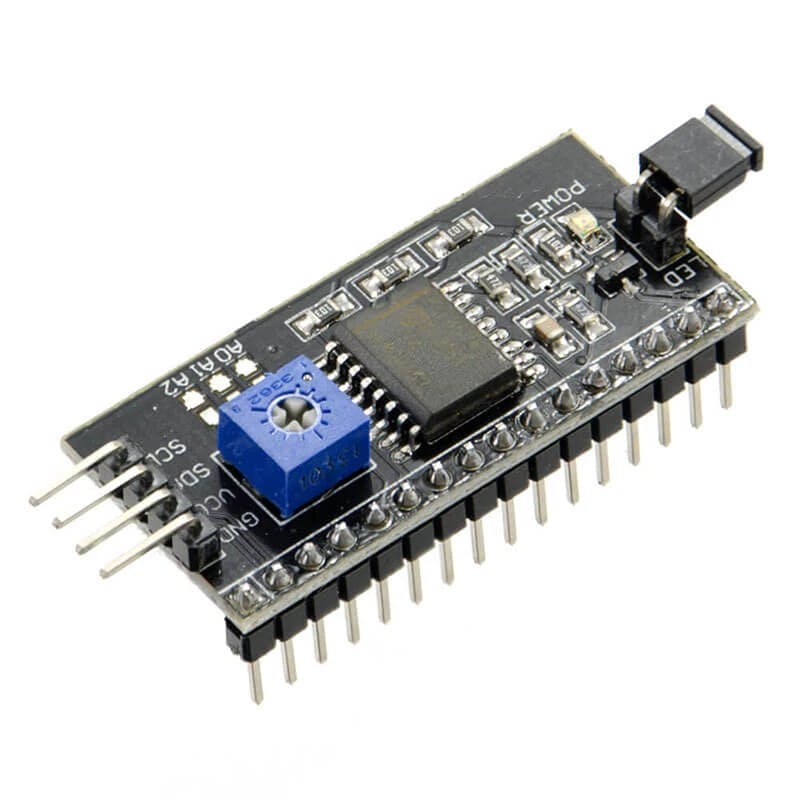
代碼
位duino_define_and_servo_code
Bit-duino_define_and_servo_code.ino
C/C++
下載(3)
| ? |
#include |
| ? | #define motor1 4 |
| ? | #define motor2 5 |
| ? | #define motor3 6 |
| ? | #define motor4 7 |
| ? | Servo.servo1; |
| ? | Servo.servo2; |
| ? | #define tx 0 |
| ? | #define rx 1 |
| ? | #define trig 2 |
| ? | #define echo 8 |
| ? | #define pir_out 3 |
| ? | #define temp 11 |
| ? | #define ir1 A0 |
| ? | #define ir2 A1 |
| ? | #define sda A4 |
| ? | #define scl A5 |
| ? | void setup() { |
| ? | // put your setup code here, to run once: |
| ? | servo1.attach(9); |
| ? | servo2.attach(10); |
| ? | ? |
| ? | } |
| ? | ? |
| ? | void loop() { |
| ? | // put your main code here, to run repeatedly: |
| ? | ? |
| ? | } |
電機控制
C/C++
| ? |
#include |
| ? | #define motor1 4 |
| ? | #define motor2 5 |
| ? | #define motor3 6 |
| ? | #define motor4 7 |
| ? | Servo.servo1; |
| ? | Servo.servo2; |
| ? | #define tx 0 |
| ? | #define rx 1 |
| ? | #define trig 2 |
| ? | #define echo 8 |
| ? | #define pir_out 3 |
| ? | #define temp 11 |
| ? | #define ir1 A0 |
| ? | #define ir2 A1 |
| ? | #define sda A4 |
| ? | #define scl A5 |
| ? | void setup() { |
| ? | // put your setup code here, to run once: |
| ? | servo1.attach(9); |
| ? | servo2.attach(10); |
| ? | pinMode(motor1, OUTPUT) |
| ? | pinMode(motor2, OUTPUT) |
| ? | pinMode(motor3, OUTPUT) |
| ? | pinMode(motor4, OUTPUT)// telling arduino that the motor pins are output/they are the controlling pins. |
| ? | } |
| ? | ? |
| ? | void loop() { |
| ? | // put your main code here, to run repeatedly: |
| ? | //1st motor forward/backward code |
| ? | digitalWrite(motor1, HIGH) |
| ? | digitalWrite(motor2, LOW)// runs the 1st motor in a direction (connct the motor to the screw terminal and see where it is rotating, if rotating forward it is forward, if rotating backward it is backward) |
| ? | ? |
| ? | digitalWrite(motor1, LOW) |
| ? | digitalWrite(motor2, HIGH)// runs the 1st motor in the opposite direction according to the above piece of code. |
| ? | // |
| ? | ? |
| ? | //2nd motor forward/backward code |
| ? | digitalWrite(motor3, HIGH) |
| ? | digitalWrite(motor4, LOW)// runs the 2nd motor in a direction (connct the motor to the screw terminal and see where it is rotating, if rotating forward it is forward, if rotating backward it is backward) |
| ? | ? |
| ? | digitalWrite(motor3, LOW) |
| ? | digitalWrite(motor4, HIGH)// runs the 2nd motor in the opposite direction according to the above piece of code. |
| ? | // |
| ? | ? |
| ? | //1st motor stop code |
| ? | digitalWrite(motor1, LOW) |
| ? | digitalWrite(motor2, LOW)//stops the 1st motor. |
| ? | // |
| ? | ? |
| ? | //2nd motor stop code |
| ? | digitalWrite(motor3, LOW) |
| ? | digitalWrite(motor4, LOW)//stops the 2nd motor. |
| ? | // |
| ? | ? |
| ? | //to turn you should make one wheel stop and one running, and then record where its turning. then you can make a function called "turn *the side turned*" and use it on your project. make functions to forward(all two wheels running forward), backward (all two wheels running backward), stop( all two wheels stop) and use them on your project. |
| ? | } |
Ultrasonic_Distance_Sensor_code
C/C++
| ? | #define motor1 4 |
| ? | #define motor2 5 |
| ? | #define motor3 6 |
| ? | #define motor4 7 |
| ? | #define tx 0 |
| ? | #define rx 1 |
| ? | #define trig 2 |
| ? | #define echo 8 |
| ? | #define pir_out 3 |
| ? | #define temp 11 |
| ? | #define ir1 A0 |
| ? | #define ir2 A1 |
| ? | #define sda A4 |
| ? | #define scl A5 |
| ? | void setup() { |
| ? | // put your setup code here, to run once: |
| ? | pinMode(trig,OUTPUT);//setting pin trig to output |
| ? | pinMode(echo,INPUT);//setting pin echo to input |
| ? | } |
| ? | ? |
| ? | void loop() { |
| ? | // put your main code here, to run repeatedly: |
| ? | digitalWrite(trig,LOW); |
| ? | delayMicroseconds(2); |
| ? | digitalWrite(trig,HIGH); |
| ? | delayMicroseconds(2); |
| ? | digitalWrite(trig,LOW); |
| ? | long t = pulseIn(echo, HIGH);// starting the sensor |
| ? | ? |
| ? | long inches = t / 74 / 2; |
| ? | long cm = t / 29 / 2; // getiing the real in/cm value |
| ? | ? |
| ? | if(cm<10){ |
| ? | //whatever you program here will run if the sensor detects something less than 10cm away from it*sensor*. can replace the above "<" with any symbol and make it "less than", "equal", "equal or less than" or "equal or greater than". |
| ? | } |
| ? | ? |
| ? | } |
PIR_sensor_code
C/C++
| ? | #define motor1 4 |
| ? | #define motor2 5 |
| ? | #define motor3 6 |
| ? | #define motor4 7 |
| ? | #define tx 0 |
| ? | #define rx 1 |
| ? | #define trig 2 |
| ? | #define echo 8 |
| ? | #define pir_out 3 |
| ? | #define temp 11 |
| ? | #define ir1 A0 |
| ? | #define ir2 A1 |
| ? | #define sda A4 |
| ? | #define scl A5 |
| ? | void setup() { |
| ? | // put your setup code here, to run once: |
| ? | pinMode(pir_out, INPUT); |
| ? | } |
| ? | ? |
| ? | void loop() { |
| ? | // put your main code here, to run repeatedly: |
| ? | int val = digitalRead(pir_out); |
| ? | ? |
| ? | if (val == 1){ |
| ? | //put a function here and it will run when sensor detects motion. |
| ? | } |
| ? | if (val == 0){ |
| ? | //put a function here and it will run when sensor doesn't detect any motion. |
| ? | } |
| ? | } |
Bluetooth_HC-06_module_receiving_numbers_code
C/C++
| ? | char ble; |
| ? | #define motor1 4 |
| ? | #define motor2 5 |
| ? | #define motor3 6 |
| ? | #define motor4 7 |
| ? | #define tx 0 |
| ? | #define rx 1 |
| ? | #define trig 2 |
| ? | #define echo 8 |
| ? | #define pir_out 3 |
| ? | #define temp 11 |
| ? | #define ir1 A0 |
| ? | #define ir2 A1 |
| ? | #define sda A4 |
| ? | #define scl A5 |
| ? | void setup() { |
| ? | // put your setup code here, to run once: |
| ? | Serial.begin(9600); |
| ? | } |
| ? | ? |
| ? | void loop() { |
| ? | // put your main code here, to run repeatedly: |
| ? | if(Serial.available()){ |
| ? | ble = Serial.read(); |
| ? | ? |
| ? | } |
| ? | if (ble == ' //any number you are going to send through bluetooth '){ |
| ? | //anything you code here gonna run when bluetooth module detects the given number. only numbers supported and requires smartphone to send signals. you can use any android Arduino Bluetooth control app and test the signal using the code below. remember when uploading the code remove the bluetooth module and reconnect it when the uploading is finished. or else the code is not gonna upload or it can severely damage your bluetooth module. |
| ? | } |
| ? | } |
- Raspberry Pi零W機械開關(guān)防護(hù)罩
- Raspberry Pi Zero 2機械開關(guān)防護(hù)罩
- 基于Arduino UNO的多合一機器人防護(hù)罩 0次下載
- DIY arduino UNO防護(hù)罩
- Raspberry Pi Zero 2機械開關(guān)防護(hù)罩設(shè)計
- Raspberry Pi零W機械開關(guān)防護(hù)罩設(shè)計
- Raspberry Pi零機械開關(guān)防護(hù)罩設(shè)計
- Raspberry Pi 2機械開關(guān)防護(hù)罩設(shè)計
- Raspberry Pi 3B+機械開關(guān)防護(hù)罩設(shè)計
- Raspberry Pi 3B機械開關(guān)防護(hù)罩設(shè)計
- Raspberry Pi 4機械開關(guān)防護(hù)罩設(shè)計
- 帶GRBL防護(hù)罩的CNC乙烯基切割機
- 基于Arduino mega rfid的門鎖系統(tǒng)防護(hù)罩
- 一體式完備的移動電源解決方案資料下載
- 12、防護(hù)罩安裝、貼標(biāo)、0220 0次下載
- 電動機外殼防護(hù)方式 1454次閱讀
- 攝像頭應(yīng)用領(lǐng)域及應(yīng)用產(chǎn)品型號 1745次閱讀
- RFID超高頻一體化讀寫器F5018介紹 1488次閱讀
- 一體式與分離式的光電水位傳感器有什么區(qū)別 4082次閱讀
- 面對疫情 醫(yī)療機器人能幫上什么忙? 2236次閱讀
- 微雪電子方形一體式電容指紋開發(fā)模塊簡介 2040次閱讀
- 微雪電子一體式紅外發(fā)送接收管簡介 1493次閱讀
- 微雪電子 Micro:bit輪式智能機器人簡介 2587次閱讀
- digilent一體式USB示波器萬用表及工作站介紹 1560次閱讀
- 一體式預(yù)付費型超聲波熱量表的原理及設(shè)計 3411次閱讀
- 一種具有能量存儲與應(yīng)力監(jiān)測功能的一體式自驅(qū)動傳感貼片 3241次閱讀
- 【新專利介紹】大口徑表閥一體式水表 656次閱讀
- Q61F一體式全焊接球閥:在同類產(chǎn)品中流體阻力最小 1597次閱讀
- 安全防護(hù)空間:機器人系統(tǒng)的限定空間 7830次閱讀
- 機器人如何識別顏色 2.6w次閱讀

 上傳資料賺積分
下載排行
本周
- 1涂鴉各WiFi模塊原理圖加PCB封裝
- 11.75 MB | 76次下載 | 1 積分
- 2錦銳科技CA51F2 SDK開發(fā)包
- 24.06 MB | 29次下載 | 1 積分
- 3錦銳CA51F005 SDK開發(fā)包
- 19.47 MB | 3次下載 | 1 積分
- 4蘋果iphone 11電路原理圖
- 4.98 MB | 3次下載 | 2 積分
- 5基礎(chǔ)模擬電子電路
- 3.80 MB | 3次下載 | 1 積分
- 6RA-Eco-RA6M4-100PIN-V1.0開發(fā)板資料
- 34.89 MB | 1次下載 | 免費
- 7STM32F3系列、STM32F4系列、STM32L4系列和STM32L4+系列Cortex-M4編程手冊
- 3.32 MB | 1次下載 | 免費
- 8聯(lián)想A820t手機維修圖紙包括主板原理圖 尾板原理圖 點位圖
- 0.62 MB | 次下載 | 5 積分
本月
- 1AI智能眼鏡產(chǎn)業(yè)鏈分析
- 4.43 MB | 383次下載 | 免費
- 2蘇泊爾電磁爐線路的電路原理圖資料合集
- 2.02 MB | 296次下載 | 5 積分
- 3貼片三極管上的印字與真實名稱的對照表詳細(xì)說明
- 0.50 MB | 94次下載 | 1 積分
- 4長虹液晶電視R-HS310B-5HF01的電源板電路原理圖
- 0.46 MB | 91次下載 | 5 積分
- 5涂鴉各WiFi模塊原理圖加PCB封裝
- 11.75 MB | 76次下載 | 1 積分
- 6錦銳科技CA51F2 SDK開發(fā)包
- 24.06 MB | 29次下載 | 1 積分
- 7AO4803A雙P通道增強型場效應(yīng)晶體管的數(shù)據(jù)手冊
- 0.11 MB | 28次下載 | 2 積分
- 8長虹液晶彩電LS29機芯的技術(shù)資料說明
- 3.42 MB | 16次下載 | 2 積分
總榜
- 1matlab軟件下載入口
- 未知 | 935127次下載 | 10 積分
- 2開源硬件-PMP21529.1-4 開關(guān)降壓/升壓雙向直流/直流轉(zhuǎn)換器 PCB layout 設(shè)計
- 1.48MB | 420064次下載 | 10 積分
- 3Altium DXP2002下載入口
- 未知 | 233089次下載 | 10 積分
- 4電路仿真軟件multisim 10.0免費下載
- 340992 | 191388次下載 | 10 積分
- 5十天學(xué)會AVR單片機與C語言視頻教程 下載
- 158M | 183342次下載 | 10 積分
- 6labview8.5下載
- 未知 | 81588次下載 | 10 積分
- 7Keil工具M(jìn)DK-Arm免費下載
- 0.02 MB | 73815次下載 | 10 積分
- 8LabVIEW 8.6下載
- 未知 | 65988次下載 | 10 積分


 工商網(wǎng)監(jiān)
評論