") 在樹莓派64位上安裝TensorFlow
在樹莓派64位上安裝TensorFlow

介紹
本頁(yè)將指導(dǎo)您在Raspberry Pi 4 64位操作系統(tǒng)Bullseye 上安裝 TensorFlow 2.10.0 或更早版本。
TensorFlow是一個(gè)專門為深度學(xué)習(xí)開發(fā)的大型軟件庫(kù)。它消耗大量資源。你可以在Raspberry Pi 4上執(zhí)行TensorFlow,但不要指望奇跡。它可以運(yùn)行您的模型,如果不是太復(fù)雜,但它將無法訓(xùn)練新模型。它也不能執(zhí)行所謂的遷移學(xué)習(xí)。除了運(yùn)行預(yù)先構(gòu)建的深度學(xué)習(xí)模型外,您還可以使用該庫(kù)將所謂的凍結(jié) TensorFlow 模型轉(zhuǎn)換為 TensorFlow Lite 平面緩沖區(qū)模型。
如果你只是想對(duì)深度學(xué)習(xí)有一些印象,請(qǐng)考慮安裝TensorFlow Lite。它的速度要快得多,使用的資源要少得多,因?yàn)樗菫镽aspberry Pi等小型計(jì)算機(jī)設(shè)計(jì)的。您可以使用許多現(xiàn)成的生成模型。在此處查看我們的 64 位 Raspberry 安裝指南。
路線圖
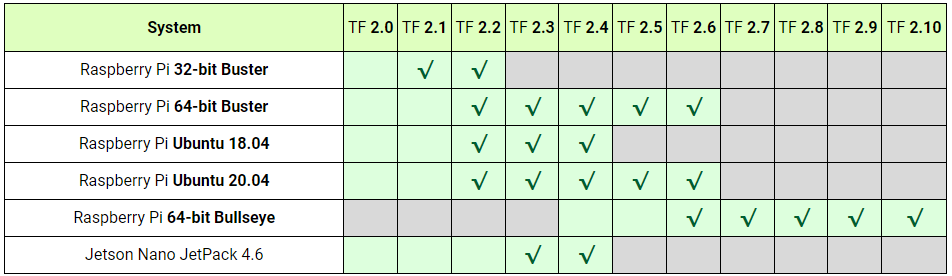
TensorFlow繼續(xù)增長(zhǎng)。每個(gè)新版本都需要更多的資源、支持軟件和庫(kù)。它越來越多地給你的樹莓派帶來了沉重的負(fù)擔(dān)。它解釋了為什么最新版本在具有“過時(shí)”操作系統(tǒng)的“舊”Raspberry Pis上不能很好地運(yùn)行。
另一方面,不建議在最新的Bullseye上安裝非常舊的TensorFlow版本。您將被迫降級(jí)某些系統(tǒng)庫(kù),這將阻止其他軟件運(yùn)行。這里最好遵循:“順其自然”。
以下是概述。綠色復(fù)選標(biāo)記表示有版本可用。空的綠色盒子意味著沒有版本,但仍然可以安裝。灰色框指定不允許“正常”安裝的硬件或軟件限制。
提示

通常,我們會(huì)收到一個(gè)問題,如果我們有一個(gè)帶有預(yù)裝框架和深度學(xué)習(xí)示例的 Raspberry Pi 4 的 SD 圖像。
我們很樂意遵守這一要求。請(qǐng)?jiān)谖覀兊腉itHub頁(yè)面上找到一個(gè)完整的Raspberry Pi 4,專門用于深度學(xué)習(xí)。 從我們的GDrive網(wǎng)站下載zip文件,解壓縮并在16 GB SD卡上刷新圖像,然后開始吧!
我們討論了兩個(gè)安裝,一個(gè)用于 Python 3,一個(gè)用于 API 庫(kù)C++。 不幸的是,沒有官方的 aarch64 pip3 輪可用于 2.7、2.6 或 2.5 版本。但是,為了您的方便,我們使用 Bazel 創(chuàng)建了我們的輪子并將它們放在 GitHub 上。
本指南的最后一部分討論了Keras的安裝。
準(zhǔn)備
Numpy
Tensorflow在最新版本的numpy中遇到了問題。將 TensorFlow 移植到 numpy 1.20 變得非常困難。現(xiàn)在,隨著TensorFlow版本2.8.0的出現(xiàn),它終于成功了。最后,安裝TensorFlow時(shí)不再有numpy版本沖突。
但是,TensorFlow 2.7.0仍然報(bào)告了一些問題。為了安全起見,請(qǐng)使用 numpy 版本 1.19.5為了TF 2.7.0 以確保一切正常。
libclang 9.0.1
TensorFlow 2.7.0 依賴于 libclang 9.0.1。沒有適用于 Debian 10 的發(fā)行版。這就是為什么只有TensorFlow 2.7安裝在Debian11Bullseye上,。你可以從頭開始在Buster RPi上安裝libclang 9.0.1,這樣你就可以安裝TensorFlow了。請(qǐng)注意,clang構(gòu)建需要大量資源,超過5 GB。最好切換到Bullseye,并在半小時(shí)內(nèi)啟動(dòng)并運(yùn)行TensorFlow
Protobuffer 4.21
最新版本的Protobuffer 4.21.0與以前的版本3.20.1相比有一些重大改進(jìn)。但是,TensorFlow尚不支持這些更改。為了使 TensorFlow 正常工作,如果您安裝了4.21 ,則需要將 Protobuf 降級(jí)到 3.20版本。
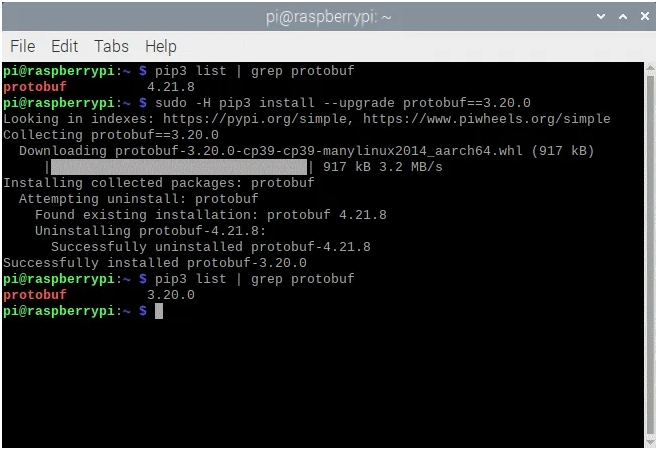
有關(guān)如何降級(jí)的更多信息,請(qǐng)?jiān)L問我們的 GitHub 頁(yè)面。
Tensorflow-io-gcs-filesystem
所有依賴項(xiàng)都可以只用一個(gè)命令安裝,除了 tensorflow-io-gcs 文件系統(tǒng)。由于沒有 aarch64 機(jī)器的發(fā)行版,我們必須從頭開始構(gòu)建 tensorflow-io-gcs 文件系統(tǒng)。整個(gè)過程可以在下面找到,應(yīng)該在安裝TensorFlow本身之前完成。如果讓TensorFlow安裝io-gcs,它將選擇錯(cuò)誤的版本并且不起作用。
# get a fresh start
$ sudo apt-get update
$ sudo apt-get upgrade
# install pip3
$ sudo apt-get install git python3-pip
# install correct version protobuf
$ sudo -H pip3 install --upgrade protobuf==3.20.0
Method 1
# download tensorflow io
$ git clone -b v0.23.1 --depth=1 --recursive https://github.com/tensorflow/io.git
$ cd io
$ python3 setup.py -q bdist_wheel --project tensorflow_io_gcs_filesystem
$ cd dist
$ sudo -H pip3 install tensorflow_io_gcs_filesystem-0.23.1-cp39-cp39-linux_aarch64.whl
$ cd ~
Method 2
# or download wheel
$ git clone https://github.com/Qengineering/Tensorflow-io.git
$ cd Tensorflow-io
$ sudo -H pip3 install tensorflow_io_gcs_filesystem-0.23.1-cp39-cp39-linux_aarch64.whl
$ cd ~
Python 3.9 的 TensorFlow wheels
TensorFlow由一個(gè)名為Bazel的Google軟件安裝程序安裝。最后,Bazel生成一個(gè)輪子來安裝TensorFlow Python版本,或者在安裝C++版本時(shí)生成一個(gè)壓縮包。這兩種方法都是樹莓派用戶所熟知的。我們已經(jīng)在GitHub頁(yè)面上發(fā)布了Bazel的結(jié)果。隨意使用這些輪子。整個(gè) TensorFlow 安裝過程從頭到尾需要很多小時(shí)(Python ±64,C++庫(kù)±1)。完成所有繁瑣的工作后,只需幾分鐘即可在Raspberry 64位Bullseye上安裝TensorFlow。對(duì)于很難完成的部分,本手冊(cè)稍后將介紹完整的程序。
整個(gè)快捷方式過程如下。wheels太大,無法存儲(chǔ)在GitHub上,因此使用Google驅(qū)動(dòng)器代替。
TensorFlow 2.10.0
# install gdown to download from Google drive
$ sudo -H pip3 install gdown
# download the wheel
$ gdown https://drive.google.com/uc?id=1G2P-FaHAXJ-UuQAQn_0SYjNwBu0aShpd
# install TensorFlow 2.10.0
$ sudo -H pip3 install tensorflow-2.10.0-cp39-cp39-linux_aarch64.whl
TensorFlow 2.9.1
# install gdown to download from Google drive
$ sudo -H pip3 install gdown
# download the wheel
$ gdown https://drive.google.com/uc?id=1xP6ErBK85SMFnQamUh4ro3jRmdCV_qDU
# install TensorFlow 2.9.1
$ sudo -H pip3 install tensorflow-2.9.1-cp39-cp39-linux_aarch64.whl
TensorFlow 2.8.0
# install gdown to download from Google drive
$ sudo -H pip3 install gdown
# download the wheel
$ gdown https://drive.google.com/uc?id=1YpxNubmEL_4EgTrVMu-kYyzAbtyLis29
# install TensorFlow 2.8.0
$ sudo -H pip3 install tensorflow-2.8.0-cp39-cp39-linux_aarch64.whl
TensorFlow 2.7.0
# utmost important: use only numpy version 1.19.5
# check the version first
$ pip3 list | grep numpy
# if not version 1.19.5, update!
$ sudo -H pip3 install numpy==1.19.5
# (re)install termcolor at the correct location
$ python3 -m pip install termcolor
# install gdown to download from Google drive
$ sudo -H pip3 install gdown
# download the wheel
$ gdown https://drive.google.com/uc?id=1FdVZ1kX5QZgWk2SSgq31C2-CF95QhT58
# install TensorFlow 2.7.0
$ sudo -H pip3 install tensorflow-2.7.0-cp39-cp39-linux_aarch64.whl
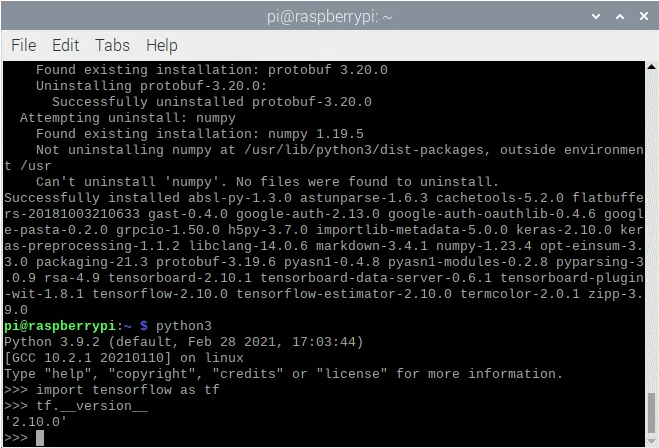
安裝成功后,應(yīng)獲得以下屏幕輸出。
TensorFlow 2.8.0 C++ API
如果你打算用C++編程,你將需要TensorFlow的C++API版本,而不是Python版本。使用我們 GitHub 頁(yè)面中的預(yù)構(gòu)建壓縮包安裝 C++ 庫(kù)可以為您節(jié)省大量時(shí)間。 請(qǐng)按照以下步驟操作。
TensorFlow 2.10.0
# get a fresh start
$ sudo apt-get update
$ sudo apt-get upgrade
# remove old versions (if found)
$ sudo rm -r /usr/local/lib/libtensorflow*
$ sudo rm -r /usr/local/include/tensorflow
# the dependencies
$ sudo apt-get install wget curl libhdf5-dev libc-ares-dev libeigen3-dev
$ sudo apt-get install libatomic1 libatlas-base-dev zip unzip
# install gdown to download from Google drive (if not already done)
$ sudo -H pip3 install gdown
# download the tarball
$ gdown https://drive.google.com/uc?id=1GOC5CiT5Ws2NpiBem4K3g3FRqmGDRcL7
# unpack the ball
$ sudo tar -C /usr/local -xzf libtensorflow_cp39_64OS_2_10_0.tar.gz
TensorFlow 2.9.1
# get a fresh start
$ sudo apt-get update
$ sudo apt-get upgrade
# remove old versions (if found)
$ sudo rm -r /usr/local/lib/libtensorflow*
$ sudo rm -r /usr/local/include/tensorflow
# the dependencies
$ sudo apt-get install wget curl libhdf5-dev libc-ares-dev libeigen3-dev
$ sudo apt-get install libatomic1 libatlas-base-dev zip unzip
# install gdown to download from Google drive (if not already done)
$ sudo -H pip3 install gdown
# download the tarball
$ gdown https://drive.google.com/uc?id=1Z83_RQTvCb2jL2BO1Zdez3x4Qx-XheRk
# unpack the ball
$ sudo tar -C /usr/local -xzf libtensorflow_cp39_64OS_2_9_1.tar.gz
TensorFlow 2.8.0
# get a fresh start
$ sudo apt-get update
$ sudo apt-get upgrade
# remove old versions (if found)
$ sudo rm -r /usr/local/lib/libtensorflow*
$ sudo rm -r /usr/local/include/tensorflow
# the dependencies
$ sudo apt-get install wget curl libhdf5-dev libc-ares-dev libeigen3-dev
$ sudo apt-get install libatomic1 libatlas-base-dev zip unzip
# install gdown to download from Google drive (if not already done)
$ sudo -H pip3 install gdown
# download the tarball
$ gdown https://drive.google.com/uc?id=1dmJKIk8lUi_XCzlVnRgL-UvfVFriRmCG
# unpack the ball
$ sudo tar -C /usr/local -xzf libtensorflow_cp39_64OS_2_8_0.tar.gz
TensorFlow 2.7.0
# get a fresh start
$ sudo apt-get update
$ sudo apt-get upgrade
# remove old versions (if found)
$ sudo rm -r /usr/local/lib/libtensorflow*
$ sudo rm -r /usr/local/include/tensorflow
# the dependencies
$ sudo apt-get install wget curl libhdf5-dev libc-ares-dev libeigen3-dev
$ sudo apt-get install libatomic1 libatlas-base-dev zip unzip
# install gdown to download from Google drive (if not already done)
$ sudo -H pip3 install gdown
# download the tarball
$ gdown https://drive.google.com/uc?id=1kScCKyj0pr265XbCgYmXqXs77xJFe6p1
# unpack the ball
$ sudo tar -C /usr/local -xzf libtensorflow_cp39_64OS_2_7_0.tar.gz
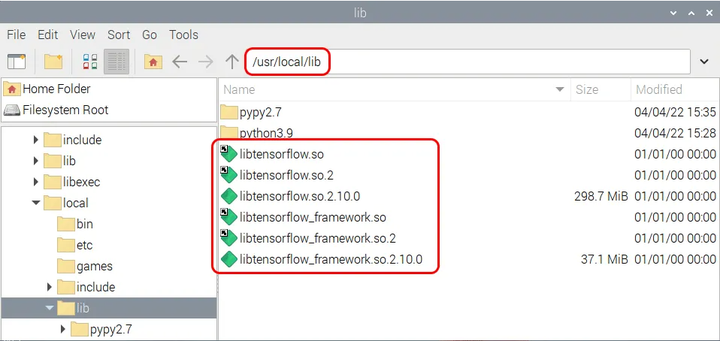
你最終應(yīng)該將 TensorFlow 庫(kù)安裝在 /usr/local/lib 位置,并將頭文件安裝在文件夾 usr/local/include/tensorflow/c 中。

從頭開始安裝
內(nèi)存交換大小
構(gòu)建完整的 TensorFlow 2.8 包需要超過 6 GB 的 RAM。如果您有具有8 GB RAM的Raspberry Pi 4,那么您就很清楚了。否則,請(qǐng)確保增加交換大小以滿足此需求。板載 4 GB RAM,zram 可以提供額外的 2 GB。有了 2 GB 的 RAM,您就不能再依靠 zram 來壓縮超過 2 倍。在這種情況下,他們必須重新安裝dphys-swapfile才能從SD卡中獲取額外的空間。如果您必須安裝 dphys-swapfile,請(qǐng)按照以下命令操作。在 Bullseye 操作系統(tǒng)上設(shè)置交換空間時(shí),完成重啟需要相當(dāng)長(zhǎng)的時(shí)間。
# install dphys-swapfile
$ sudo apt-get install dphys-swapfile
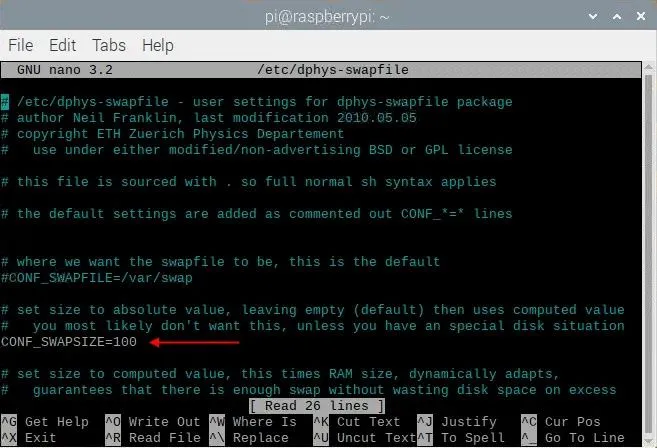
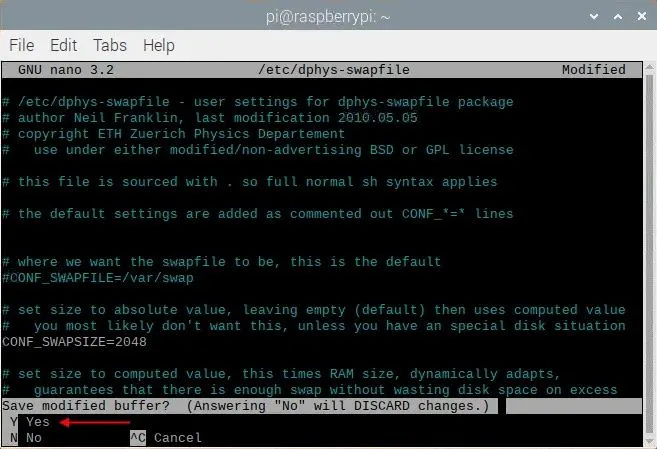
# give the required memory size
$ sudo nano /etc/dphys-swapfile
# reboot afterwards
$ sudo reboot

如果一切順利,你應(yīng)該有這樣的東西。
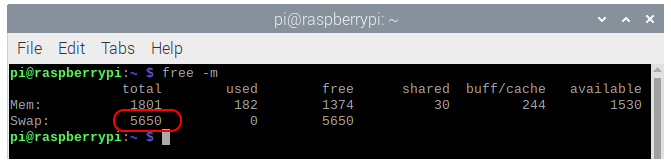
作為記錄,顯示的數(shù)字是dphys-swapfile和zram分配的交換空間總量。請(qǐng)不要忘記在完成后刪除dphys-swapfile。
注意:如果在同時(shí)啟用 zram 和 dphys-swapfile 的情況下重新啟動(dòng) Raspberry Pi,zram 將在啟動(dòng)期間禁用 dphys-swapfile。您必須手動(dòng)重新激活此服務(wù)。
# reactivate dphys-swapfile after a reboot
# (when zram and dphys-swapfile are both enabled)
$ sudo /etc/init.d/dphys-swapfile stop
$ sudo /etc/init.d/dphys-swapfile start
Bazel
Bazel是Google的免費(fèi)軟件工具,用于自動(dòng)構(gòu)建和測(cè)試軟件包。你可以將它與OpenCV使用的CMake進(jìn)行比較,但后者只構(gòu)建軟件,沒有測(cè)試工具。Bazel是用Java編寫的,Java是一種獨(dú)立于平臺(tái)的語(yǔ)言,在語(yǔ)法方面主要基于C++。要編譯 Bazel,我們必須首先使用以下命令安裝 Java 和其他一些依賴項(xiàng)。
# get a fresh start
$ sudo apt-get update
$ sudo apt-get upgrade
# install pip and pip3
$ sudo apt-get install python3-pip
# install some tools
$ sudo apt-get install zip unzip curl
# install Java
$ sudo apt-get install openjdk-11-jdk
接下來,我們可以下載并解壓縮 Bazel 軟件。我們需要 TensorFlow 2.1.0 的 Bazel 版本 5.1.1,因此請(qǐng)確保安裝正確的版本。
$ wget https://github.com/bazelbuild/bazel/releases/download/5.1.1/bazel-5.1.1-dist.zip
$ unzip -d bazel bazel-5.1.1-dist.zip
$ cd bazel
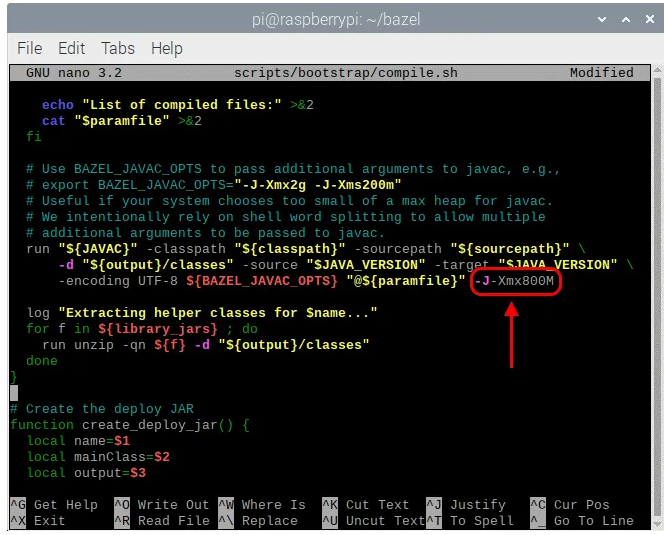
在安裝過程中,Bazel 使用預(yù)定義的可用工作內(nèi)存比率。由于樹莓派的 RAM 大小有限,這個(gè)比例太小了。為防止崩潰,我們必須將此內(nèi)存的大小定義為最大板載 RAM 的 40%。例如,800 MB用于2 GByte RAM Raspberry Pi。這是通過在腳本文件 compile.sh 中添加一些額外信息來完成的。您可以將文本 -J-Xmx800M 添加到以 run 開頭的行中。 (第 144 行左右)。請(qǐng)參閱下面的屏幕。使用眾所周知的、、保存更改(請(qǐng)參閱上面的幻燈片放映)。
$ nano scripts/bootstrap/compile.sh -c
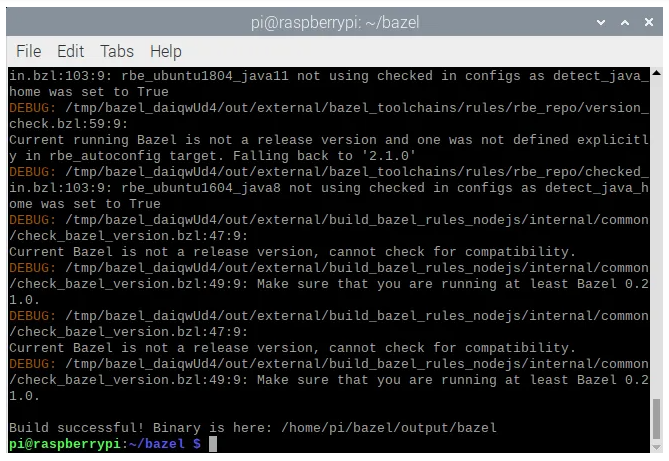
一旦 Bazel 的 Java 環(huán)境最大化,您就可以使用下一個(gè)命令開始構(gòu)建 Bazel 軟件。完成后,將二進(jìn)制文件復(fù)制到 /usr/local/bin 位置,以便 bash 可以在任何地方找到可執(zhí)行文件。最后一個(gè)操作是刪除 zip 文件。整個(gè)構(gòu)建大約需要 33 分鐘。
# start the build
$ env EXTRA_BAZEL_ARGS="--host_javabase=@local_jdk//:jdk" bash ./compile.sh
# copy the binary
$ sudo cp output/bazel /usr/local/bin/bazel
# clean up
$ cd ~
$ rm bazel-5.1.1-dist.zip
# if you have a copied bazel to /usr/local/bin you may also
# delete the whole bazel directory, freeing another 500 MByte
$ sudo rm -rf bazel
安裝 TensorFlow for Python 3
隨著Bazel的啟動(dòng)和運(yùn)行,我們可以開始在64位Raspberry Pi for Python 3上構(gòu)建TensorFlow 2.10.0。這幾乎正在成為標(biāo)準(zhǔn)做法。首先,安裝一些依賴項(xiàng),然后從 GitHub 下載 zip,最后解壓縮軟件。您還必須安裝 tensorflow_io_gcs 文件系統(tǒng)。它是通過使用我們的 GitHub 存儲(chǔ)庫(kù)中的預(yù)編譯輪來完成的。
TensorFlow 2.10.0
# get a fresh start
$ sudo apt-get update
$ sudo apt-get upgrade
# the dependencies
$ sudo apt-get install zip unzip
$ sudo -H pip3 install keras_applications --no-deps
$ sudo -H pip3 install keras_preprocessing --no-deps
# install correct version protobuf
$ sudo -H pip3 install --upgrade protobuf==3.20.0
# download tensorflow io
$ git clone https://github.com/Qengineering/Tensorflow-io.git
$ cd Tensorflow-io
$ sudo -H pip3 install tensorflow_io_gcs_filesystem-0.23.1-cp39-cp39-linux_aarch64.whl
$ cd ~
# download TensorFlow 2.10.0
$ wget -O tensorflow.zip https://github.com/tensorflow/tensorflow/archive/v2.10.0.zip
$ unzip tensorflow.zip
$ cd tensorflow-2.10.0
$ ./configure
TensorFlow 2.9.1
# get a fresh start
$ sudo apt-get update
$ sudo apt-get upgrade
# the dependencies
$ sudo apt-get install zip unzip
$ sudo -H pip3 install keras_applications --no-deps
$ sudo -H pip3 install keras_preprocessing --no-deps
# install correct version protobuf
$ sudo -H pip3 install --upgrade protobuf==3.20.0
# download tensorflow io
$ git clone https://github.com/Qengineering/Tensorflow-io.git
$ cd Tensorflow-io
$ sudo -H pip3 install tensorflow_io_gcs_filesystem-0.23.1-cp39-cp39-linux_aarch64.whl
$ cd ~
# download TensorFlow 2.9.1
$ wget -O tensorflow.zip https://github.com/tensorflow/tensorflow/archive/v2.9.1.zip
$ unzip tensorflow.zip
$ cd tensorflow-2.9.1
$ ./configure
TensorFlow 2.8.0
# get a fresh start
$ sudo apt-get update
$ sudo apt-get upgrade
# the dependencies
$ sudo apt-get install zip unzip
$ sudo -H pip3 install keras_applications --no-deps
$ sudo -H pip3 install keras_preprocessing --no-deps
# install correct version protobuf
$ sudo -H pip3 install --upgrade protobuf==3.20.0
$ cd ~
# download TensorFlow 2.8.0
$ wget -O tensorflow.zip https://github.com/tensorflow/tensorflow/archive/v2.8.0.zip
$ unzip tensorflow.zip
$ cd tensorflow-2.8.0
$ ./configure
TensorFlow 2.7.0
# get a fresh start
$ sudo apt-get update
$ sudo apt-get upgrade
# the dependencies
$ sudo apt-get install zip unzip
$ sudo -H pip3 install keras_applications --no-deps
$ sudo -H pip3 install keras_preprocessing --no-deps
# download TensorFlow 2.7.0
$ wget -O tensorflow.zip https://github.com/tensorflow/tensorflow/archive/v2.7.0.zip
$ unzip tensorflow.zip
$ cd tensorflow-2.7.0
$ ./configure
構(gòu)建 Python 3 安裝輪之前的最后一步是使用一些環(huán)境變量配置構(gòu)建。這是由 ./configure 腳本文件完成的。將 Python 3 定義為默認(rèn)的 Python 版本,對(duì)所有其他問題定義為“否”。
pi@raspberrypi:~/tensorflow-2.10.0 $ ./configure
You have bazel 5.1.1- (@non-git) installed.
Please specify the location of python. [Default is /usr/bin/python3]:

Found possible Python library paths:
 /usr/lib/python3/dist-packages
 /usr/local/lib/python3.9/dist-packages
Please input the desired Python library path to use.  Default is [/usr/lib/python3/dist-packages]

Do you wish to build TensorFlow with ROCm support? [y/N]: n
No ROCm support will be enabled for TensorFlow.

Do you wish to build TensorFlow with CUDA support? [y/N]: n
No CUDA support will be enabled for TensorFlow.

Do you wish to download a fresh release of clang? (Experimental) [y/N]: n
Clang will not be downloaded.

Please specify optimization flags to use during compilation when bazel option "--config=opt" is specified [Default is -Wno-sign-compare]:

Would you like to interactively configure ./WORKSPACE for Android builds? [y/N]: n
Not configuring the WORKSPACE for Android builds.

Preconfigured Bazel build configs. You can use any of the below by adding "--config=<>" to your build command. See .bazelrc for more details.
--config=mkl          # Build with MKL support.
--config=mkl_aarch64 # Build with oneDNN and Compute Library for the Arm Architecture (ACL).
--config=monolithic   # Config for mostly static monolithic build.
--config=numa         # Build with NUMA support.
--config=dynamic_kernels # (Experimental) Build kernels into separate shared objects.
--config=v2           # Build TensorFlow 2.x instead of 1.x.
Preconfigured Bazel build configs to DISABLE default on features:
--config=noaws        # Disable AWS S3 filesystem support.
--config=nogcp        # Disable GCP support.
--config=nohdfs       # Disable HDFS support.
--config=nonccl       # Disable NVIDIA NCCL support.
Configuration finished
腳本文件現(xiàn)已全部設(shè)置完畢,可以使用以下命令開始大規(guī)模構(gòu)建。-Xmx1624m 設(shè)置運(yùn)行 Bazel 的 Java 環(huán)境的內(nèi)存大小。給它盡可能多的空間。我們建議 80% 的樹莓派內(nèi)存大小。在我們的例子中,我們有 2 GB 板載,所以 1624 MB 為除 Bazel 之外的其他線程留下了足夠的空間。
另一點(diǎn)是Basel 使用的內(nèi)核數(shù)量。最好使用一個(gè)內(nèi)核。運(yùn)行慢一點(diǎn)比崩潰好一點(diǎn)(總是在最后)并重新開始。
在生成過程中關(guān)閉所有其他應(yīng)用程序。運(yùn)行的其他進(jìn)程越少,編譯速度就越快。
$ sudo bazel clean
$ sudo bazel --host_jvm_args=-Xmx1624m build
             --config=opt
             --config=noaws
             --config=nogcp
             --config=nohdfs
             --config=nonccl
             --config=monolithic
             --config=v2
             --local_cpu_resources=1
             --define=tflite_pip_with_flex=true
             --copt=-ftree-vectorize
             --copt=-funsafe-math-optimizations
             --copt=-ftree-loop-vectorize
             --copt=-fomit-frame-pointer
             //tensorflow/tools/pip_package:build_pip_package
經(jīng)過 41 小時(shí)(或更長(zhǎng)時(shí)間!)編譯后,您將看到以下屏幕。
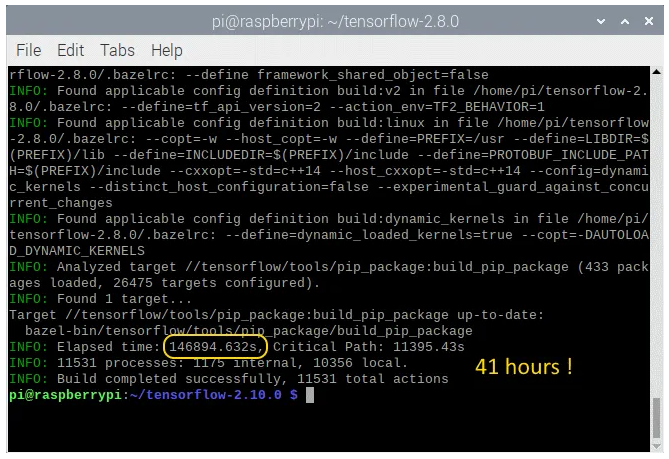
現(xiàn)在我們必須生成wheel并安裝它。這是通過以下命令完成的。安裝大約只需幾分鐘。
TensorFlow 2.10.0
# synthesize the wheel
$ sudo bazel-bin/tensorflow/tools/pip_package/build_pip_package /tmp/tensorflow_pkg
$ cd ~
# go to the folder where the wheel is located and install tensorflow
$ cd /tmp/tensorflow_pkg
$ sudo -H pip3 install tensorflow-2.10.0-cp39-cp39-linux_aarch64.whl
TensorFlow 2.9.1
# synthesize the wheel
$ sudo bazel-bin/tensorflow/tools/pip_package/build_pip_package /tmp/tensorflow_pkg
$ cd ~
# go to the folder where the wheel is located and install tensorflow
$ cd /tmp/tensorflow_pkg
$ sudo -H pip3 install tensorflow-2.9.1-cp39-cp39-linux_aarch64.whl
TensorFlow 2.8.0
# synthesize the wheel
$ sudo bazel-bin/tensorflow/tools/pip_package/build_pip_package /tmp/tensorflow_pkg
$ cd ~
# go to the folder where the wheel is located and install tensorflow
$ cd /tmp/tensorflow_pkg
$ sudo -H pip3 install tensorflow-2.8.0-cp39-cp39-linux_aarch64.whl
TensorFlow 2.7.0
# synthesize the wheel
$ sudo bazel-bin/tensorflow/tools/pip_package/build_pip_package /tmp/tensorflow_pkg
$ cd ~
# go to the folder where the wheel is located and install tensorflow
$ cd /tmp/tensorflow_pkg
$ sudo -H pip3 install tensorflow-2.7.0-cp39-cp39-linux_aarch64.whl
安裝 TensorFlow C++ API
如前所述,您可以使用 GitHub 頁(yè)面上的壓縮包非常快速地安裝 TensorFlow C++ API;不需要經(jīng)過漫長(zhǎng)的安裝過程。 對(duì)于那些想要自己構(gòu)建 API 的人,現(xiàn)在遵循安裝指南。
首先,如果尚未安裝 Bazel。該過程也在上面描述。一旦 Bazel 開始工作,你可以安裝依賴項(xiàng)并下載 TensorFlow,如果之前還沒有為 Python 3 安裝完成的話。
TensorFlow 2.10.0
# the dependencies
$ sudo apt-get install build-essential make cmake wget zip unzip
$ sudo apt-get install libhdf5-dev libc-ares-dev libeigen3-dev
$ sudo apt-get install libatlas-base-dev
# download TensorFlow 2.10.0
$ wget -O tensorflow.zip https://github.com/tensorflow/tensorflow/archive/v2.10.0.zip
# unpack the folder
$ unzip tensorflow.zip
$ cd tensorflow-2.10.0
$ ./configure
TensorFlow 2.9.1
# the dependencies
$ sudo apt-get install build-essential make cmake wget zip unzip
$ sudo apt-get install libhdf5-dev libc-ares-dev libeigen3-dev
$ sudo apt-get install libatlas-base-dev
# download TensorFlow 2.10.0
$ wget -O tensorflow.zip https://github.com/tensorflow/tensorflow/archive/v2.10.0.zip
# unpack the folder
$ unzip tensorflow.zip
$ cd tensorflow-2.10.0
$ ./configure
TensorFlow 2.8.0
# the dependencies
$ sudo apt-get install build-essential make cmake wget zip unzip
$ sudo apt-get install libhdf5-dev libc-ares-dev libeigen3-dev
$ sudo apt-get install libatlas-base-dev
# download TensorFlow 2.8.0
$ wget -O tensorflow.zip https://github.com/tensorflow/tensorflow/archive/v2.8.0.zip
# unpack the folder
$ unzip tensorflow.zip
$ cd tensorflow-2.8.0
$ ./configure
TensorFlow 2.7.0
# the dependencies
$ sudo apt-get install build-essential make cmake wget zip unzip
$ sudo apt-get install libhdf5-dev libc-ares-dev libeigen3-dev
$ sudo apt-get install libatlas-base-dev
# download TensorFlow 2.7.0
$ wget -O tensorflow.zip https://github.com/tensorflow/tensorflow/archive/v2.7.0.zip
# unpack the folder
$ unzip tensorflow.zip
$ cd tensorflow-2.7.0
$ ./configure
同樣,我們需要在實(shí)際構(gòu)建開始之前配置 Bazel。盡管我們要構(gòu)建一個(gè)C++ API,但Bazel腳本文件需要設(shè)置為Python 3作為默認(rèn)Python版本,而所有其他問題則需要設(shè)置為“否”。 回答腳本文件的所有問題后,您最終會(huì)得到與上所示相同的輸出屏幕。
最后一步是命令行及其選項(xiàng)。同樣,與之前使用的幾乎相同。這里最重要的是 --config=monolithic 標(biāo)志。沒有這個(gè)方向,TensorFlow將無法與OpenCV一起使用,反之亦然。就像pip編譯一樣,Java環(huán)境(-Xmx1624m)的內(nèi)存必須最大化到Raspberry Pi板載內(nèi)存的80%。 最后一行表示壓縮包庫(kù)構(gòu)建,而不是pip wheel。
$ sudo bazel --host_jvm_args=-Xmx1624m build
             --config=opt
             --config=noaws
             --config=nogcp
             --config=nohdfs
             --config=nonccl
             --config=monolithic
             --config=v2
             --local_cpu_resources=1
             --copt=-ftree-vectorize
             --copt=-funsafe-math-optimizations
             --copt=-ftree-loop-vectorize
             --copt=-fomit-frame-pointer
             //tensorflow/tools/lib_package:libtensorflow
經(jīng)過漫長(zhǎng)的 12 個(gè)小時(shí)等待,您將看到以下屏幕。
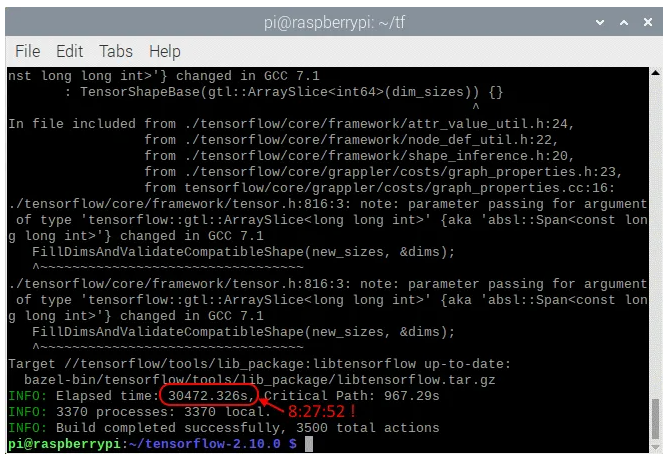
最后一步是安裝壓縮包。這是通過以下命令完成的。
$ sudo tar -C /usr/local -xzf bazel-bin/tensorflow/tools/lib_package/libtensorflow.tar.gz
安裝后,您必須具有相同的文件夾(/usr/local/lib 和 usr/local/include/tensorflow/c),如本頁(yè)開頭所示。
清除
成功安裝后,不再需要許多文件。bazel 生成的中間對(duì)象文件占用大約 6 GB 的磁盤。刪除不會(huì)造成任何傷害。
# clean up the whole bazel cache
$ sudo rm -rf ~/.cache/bazel
如果您必須重新安裝 dphys-swapfile,是時(shí)候再次卸載它了。這樣,您將延長(zhǎng)SD卡的使用壽命。
# remove the dphys-swapfile (if installed)
$ sudo /etc/init.d/dphys-swapfile stop
$ sudo apt-get remove --purge dphys-swapfile
審核編輯:湯梓紅
-
工控機(jī)
+關(guān)注
關(guān)注
10文章
1895瀏覽量
51664 -
樹莓派
+關(guān)注
關(guān)注
121文章
1977瀏覽量
107214 -
tensorflow
+關(guān)注
關(guān)注
13文章
330瀏覽量
61099
發(fā)布評(píng)論請(qǐng)先 登錄
RK3399開發(fā)板香橙派4在Ubuntu系統(tǒng)下如何安裝TensorFlow
在arm的云服務(wù)器外樹莓派4上安裝kata-container
樹莓派的種類_樹莓派安裝教程
樹莓派3硬件配置_樹莓派3都能裝什么系統(tǒng)_樹莓派3系統(tǒng)安裝教程
使用樹莓派設(shè)計(jì)智能小車教程之如何進(jìn)行樹莓派模塊安裝資料免費(fèi)下載
在樹莓派3B上運(yùn)行64位系統(tǒng)的測(cè)評(píng)詳細(xì)說明
【樹莓派】樹莓派4B新手篇:安裝官網(wǎng)Raspbian Buster系統(tǒng)及基礎(chǔ)配置

樹莓派32 位和 64 位在實(shí)際測(cè)試中表現(xiàn)如何
TensorFlow手勢(shì)識(shí)別樹莓派開源
用樹莓派搞深度學(xué)習(xí)?TensorFlow啟動(dòng)!


 工商網(wǎng)監(jiān)
評(píng)論