 電子發燒友App


01 ? ? ? 序
很久沒有寫過博客了,最近忙于做項目,閉了后簡單寫一下心得體會。近期主要是在做服飾場景相關的項目,今天簡單寫寫其中做的一個服飾分割。
初版代碼已經提交,歡迎大家提issue和pr
https://github.com/FlyEgle/segmentationlight
02 ? ? ? 背景
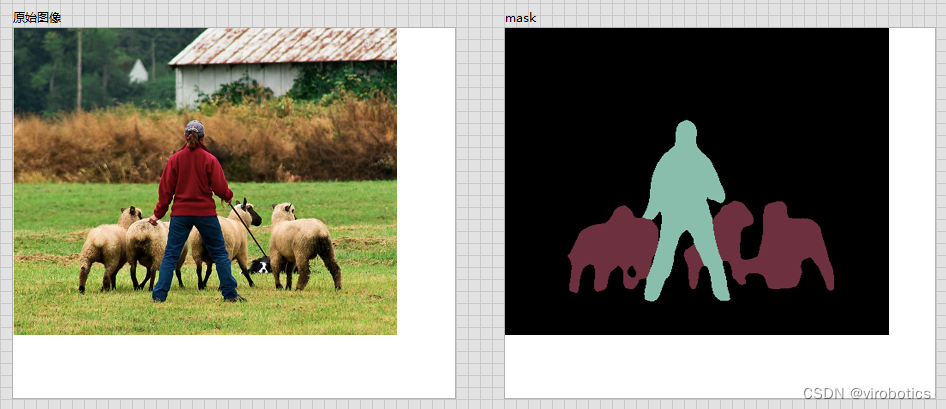
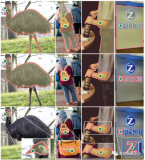
主要場景就是對模特進行服飾摳圖,要求邊緣處理相對平滑,扣取召回和準確率比較高,能夠覆蓋95%以上的場景case。同時需要考慮模型FLOPs以及結構便宜性,便于后期有壓縮的需求。
03 ? ? ? 模型選擇
有考慮過如下三種模型:
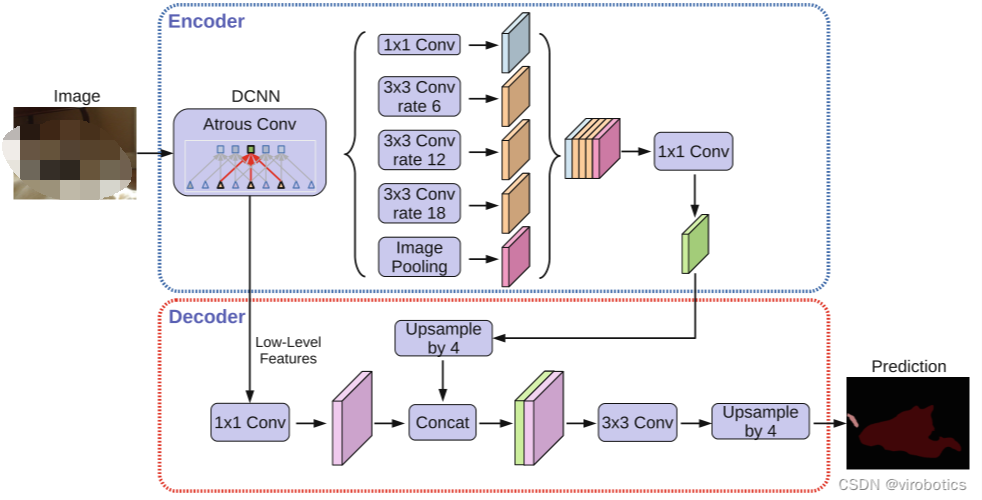
DeepLabV3
U2Net
HRNet-seg
這里DeepLabV3有空洞卷積存在,對于細致的扣圖,效果不是很好,更加適用于連通性比較強的物體分割以及多類別分割。
HRNet-seg存在一個問題,最后輸出的featuremap分別是[1/4, 1/8, 1/16, 1/32],雖然是有不斷的高低分辨率的交互,但是1/4還是有點捉襟見肘,會影響一些小的pixel,空洞以及邊緣效果。所以做了簡單的修該如下:
FPN+upsmaple形式

FPN+upsample
upsmaple+cat

upsmaple+cat 相對來說FPN的收斂速度會更快一些,計算量更小,性能略高,相比原始HRseg的輸出來說,細致化了很多。 3. U2net的計算量要比HRnet-fpn更小,同時,U2net更加注重刻畫細節。由于場景只有一個類別,所以U2Net不太需要考慮類別的關系,對于模型本身來說更加適配。 4. 有嘗試過修改U2net,包括增加attention,增加refine Module,多監督約束以及修改結構等,不過最終都比較雞肋了,寫paper還是可以的,從實際case效果上看幾乎無差。也嘗試過x2,x4channel,性能上也沒明顯提升。 不過對于專一場景來說,模型本身不是重點。
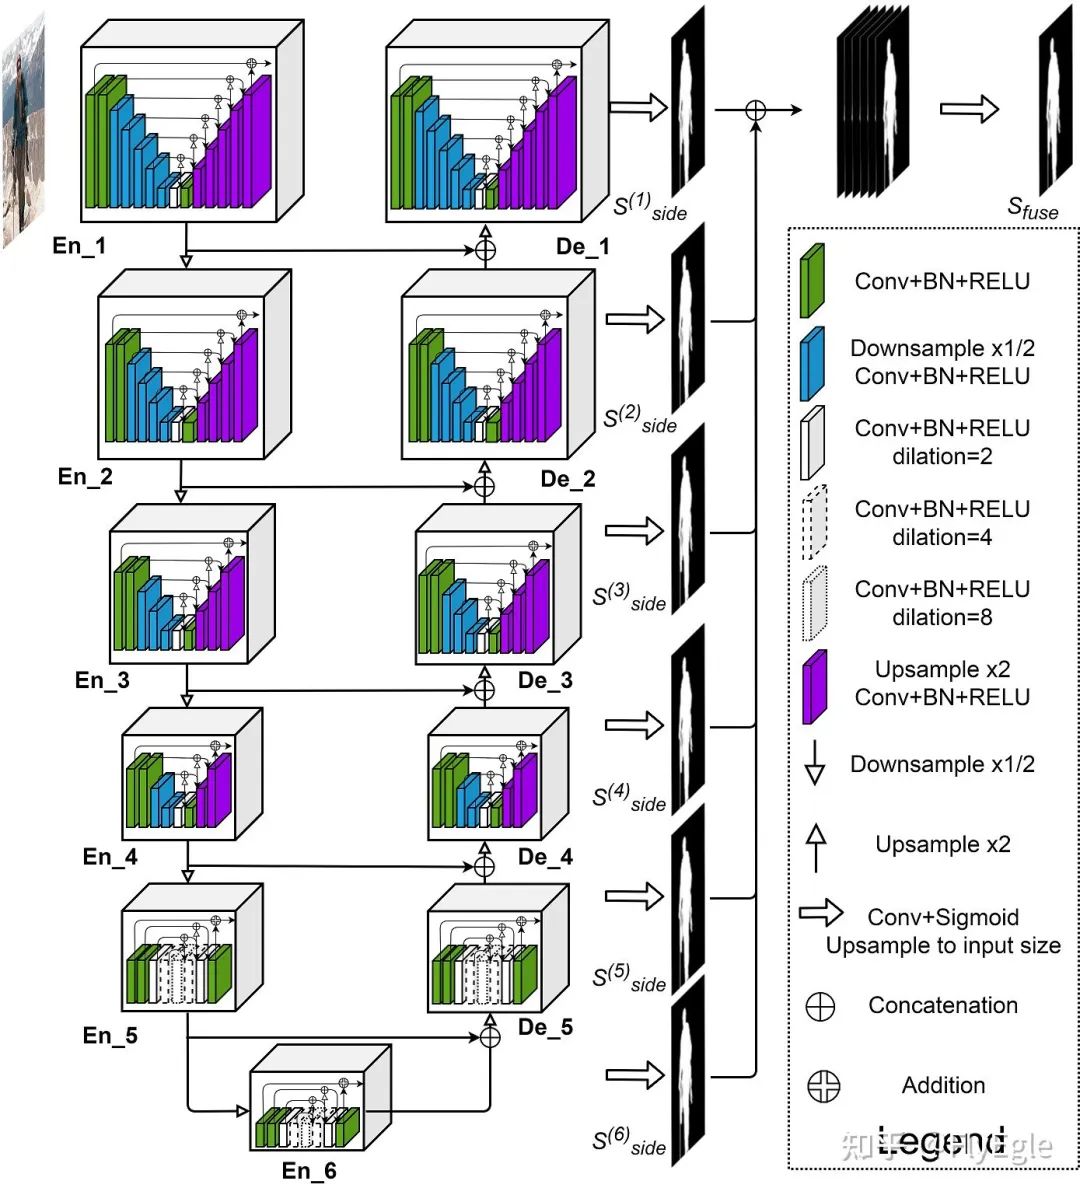
u2net模型結構
04 ? ? ? 損失設計
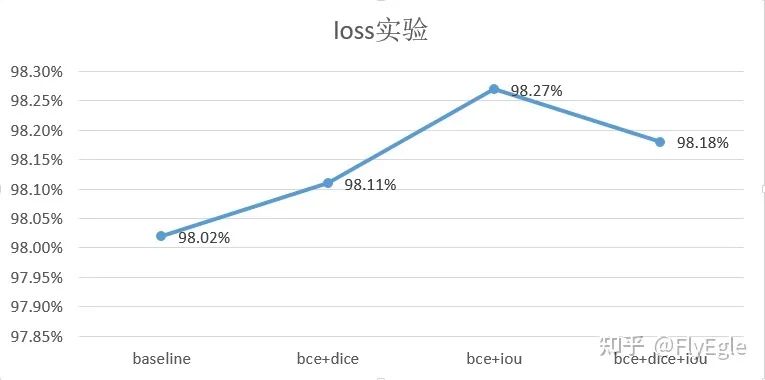
任務只要求區分前景和背景,自然可以理解為二分類或者是1分類問題,所以基礎loss的選擇就可以是softmax+CE(二分類),sigmoid+bce(前景)。sigmoid相比softmax對于邊緣效果更佳友好(可以調節閾值),為了保證連通區域,采用了bce+3*dice作為baseline損失。 這里在320x320尺寸下,做了一些對比實驗,可以看到bce+iou指標最高,不過case by case的話視覺效果沒有bce+dice好。降低dice的系數,也是因為有時候dice過強忽略了bce判別正負樣本的情況。
損失函數 也嘗試過一些其他的loss,如focalloss,tv, L1等損失組合,意義不是很大, 代碼如下:
# ----------------- DICE Loss--------------------class DiceLoss(nn.Module):
    def __init__(self):
        super(DiceLoss, self).__init__()

    def forward(self, logits, targets, mask=False):
        num = targets.size(0)
        smooth = 1.


        probs = torch.sigmoid(logits)
        m1 = probs.view(num, -1)
        m2 = targets.view(num, -1)
        intersection = (m1 * m2)

        score = 2. * (intersection.sum(1) + smooth) / (m1.sum(1) + m2.sum(1) + smooth)
        score = 1 - score.sum() / num
        return score# -------------------- BCELoss -----------------------class BCELoss(nn.Module):
    """binary bceloss with sigmoid"""
    def __init__(self):
        super(BCELoss, self).__init__()


    def forward(self, inputs, targets, weights=None, mask=False):
        assert len(inputs.shape) == 4, "inputs shape must be NCHW"
        if len(targets.shape) != 4:
            targets = targets.unsqueeze(1).float()
        else:
            targets = targets.float()
        if mask:
            inputs  = inputs * targets
        losses = F.binary_cross_entropy_with_logits(inputs, targets, weights)
        return losses# ----------------- DICE+BCE Loss--------------------class DiceWithBCELoss(nn.Module):
    def __init__(self, weights, mining=False):
        super(DiceWithBCELoss, self).__init__()
        self.dice_loss = DiceLoss()
        if mining:
            self.bce_loss = BalanceCrossEntropyLoss()
        else:
            self.bce_loss = BCELoss()
        self.weights = weights


    def forward(self, preds, targets):
        bceloss = self.bce_loss(preds, targets)
        diceloss = self.dice_loss(preds, targets)
????????return?self.weights['bce']?*?bceloss?+?self.weights['dice']*diceloss
05 ? ? ? 訓練優化
1. 分辨率
baseline模型的訓練尺寸為320x320,隨之提升到了640x640,這里采用兩種方法,一個是from strach訓練一個是load 320的pretrain 進行訓練。相比于strach,pretrain的效果會更好,隨著數據的迭代和累積,不斷的采用上一個最好效果的weights來做下一次訓練模型的pretrain,最終訓練尺寸為800x800。 嘗試過采用更大的分辨率960和1024來進行訓練,在個人的場景上基本沒有顯著提升。(ps: 1024尺寸下的bs太小了,加了accumulate grad后性能下降的明顯)
2. 數據增強
數據增強采用基本都是常規的,隨機crop,隨機翻轉,隨機旋轉,隨機blur,這里colorjitter會影響性能就沒有用了。
def build_transformers(crop_size=(320, 320)):
    if isinstance(crop_size, int):
        crop_size = (crop_size, crop_size)

    data_aug = [
        # RandomCropScale(scale_size=crop_size, scale=(0.4, 1.0)),
        RandomCropScale2(scale_size=crop_size, scale=(0.3, 1.2), prob=0.5),
        RandomHorizionFlip(p=0.5),
        RandomRotate(degree=15, mode=0),
        RandomGaussianBlur(p=0.2),
    ]


    to_tensor = [
        Normalize(normalize=True, mean=IMAGENET_DEFAULT_MEAN, std=IMAGENET_DEFAULT_STD),
        ToTensor(channel_first=True)
    ]


    final_aug = data_aug + to_tensor
    return Compose(final_aug)
比較重要的一點的是randomcrop,調整了crop的區域為[0.3,1.2],一方面是因為crop區域太小,容易忽視整體性,另一方面是crop大一些可以相應的對應大分辨率。要注意的是,crop的區域是需要包含前景,可以通過設定前景占比來進行調整,也可以理解為手動balance數據。
class RandomCropScale2:
    """RandomCrop with Scale the images & targets, if not crop fit size, need to switch the prob to do reisze to keep the over figure        scale_size :  (list) a sequence of scale        scale      :  default is (0.08, 1.0),  crop region areas        ratio      :  default is (3. / 4., 4. / 3.), ratio for width / height    Returns:        scale_image : (ndarray) crop and scale image        scale_target: (ndarray) crop and scale target, shape  is same with image    """
    def __init__(self, scale_size, scale=(0.08, 1.0), ratio=(3. / 4., 4. / 3.), prob=0.5):
        self.scale_size = scale_size
        self.scale = scale
        self.ratio = ratio


        # self.prob = np.random.uniform(0, 1) > prob
        self.prob = prob
        self.scale_func = Scale(self.scale_size)

        # center crop
        # self.centercrop = CenterCrop(self.scale_size)

        if (self.scale[0] > self.scale[1]) or (self.ratio[0] >  self.ratio[1]):
            warnings.warn("Scale and ratio  should be of kind (min, max)")

    def _isBG(self, tgts):
        """If the targets all is 0, 0 is background        """
        if np.sum(tgts) == 0:
            return True
        else:
            return False

    # TODO: fix empty bug
    def _crop_imgs(self, imgs, tgts):
        height, width, _ = imgs.shape
        area =  height * width


        for _ in range(10):
            target_area = area * np.random.uniform(self.scale[0], self.scale[1])
            aspect_ratio = np.random.uniform(self.ratio[0], self.ratio[1])


            w = int(round(math.sqrt(target_area * aspect_ratio)))
            h = int(round(math.sqrt(target_area / aspect_ratio)))


            if 0 < w < width and 0 < h < height:
                random_y = np.random.randint(0, height - h + 1)
                random_x = np.random.randint(0, width - w + 1)

                crop_image = imgs[random_y:random_y+h, random_x:random_x+w]
                crop_target = tgts[random_y:random_y+h, random_x:random_x+w]


                if not self._isBG(crop_target):
                    crop_image, crop_target = self.scale_func(crop_image, crop_target)
                    return crop_image, crop_target

            # switch prob or center crop
            if np.random.uniform(0, 1) > self.prob:
                # center crop
                in_ratio = float(width) / float(height)
                if in_ratio < min(self.ratio):
                    w = width
                    h = int(round(w / min(self.ratio)))
                elif in_ratio > max(self.ratio):
                    h = height
                    w = int(round(h * max(self.ratio)))
                else:
                    w = width
                    h = height

                # navie center crop
                crop_x = max((width - w) // 2, 0)
                crop_y = max((height  - h) // 2, 0)
                imgs = imgs[crop_y:crop_y+height,  crop_x:crop_x+width]
                tgts = tgts[crop_y:crop_y+height, crop_x:crop_x+width]

            # scale
            crop_image, crop_target = self.scale_func(imgs, tgts)
            return crop_image, crop_target


    def __call__(self, imgs, tgts):
        crop_image, crop_target = self._crop_imgs(imgs, tgts)
????????return?crop_image,?crop_target
3. 數據
這個就仁者見仁智者見智了,查缺補漏就好,一般新數據,我會用模型過濾一遍,卡個0.98或者0.99的miou,小于這個閾值的用于訓練,大于閾值的采樣訓練。 訓練這里采用的是ADAMW優化器,1e-2的weights decay,5e-4到1e-4調整學習率,視情況而定。(ADAMW偶爾會出現nan的問題,要查找是否數據有nan,如果沒有大概率是因為有bn導致的數值溢出,可以調小LR或者更換優化器)采用了CircleLR進行衰減,效果還算ok,跑相同300個epoch,比CosineLR要好一點點。最終場景驗證數據可以到達99%+的miou。
06 ? ? ? 邊緣優化
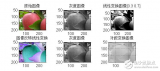
Sigmoid訓練后,可以簡單的卡個閾值來進行邊緣平滑處理,可以二值也可以過渡。
output[output >= thre] = 1 or None
output[output < thre] = 0
?

邊緣
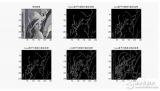
粗看邊緣還算可以,但是細看就發現鋸齒很明顯了,還需要進一步處理,這里簡單做了一個算法,縮放現有的mask(這里縮放可以用contour,也可以用腐蝕,也可以用shapely),把原始圖像做blur,把外圈的blur貼回來。
def edgePostProcess(mask, image):
    """Edge post Process    Args:
mask: a ndarray map, value is [0,255], shape is (h, w, 3)
     image: a ndarray map, value is 0-255, shape  is(h, w, 3)
  Returns:
   outputs: edge blur image    """
    mask[mask==255] = 1
    mask = getShrink(mask)

    image = image * mask
    image[image==0] = 255
    blur_image = cv2.GaussianBlur(image, (5, 5), 0)
    new_mask = np.zeros(image.shape, np.uint8)
    contours, hierachy = cv2.findContours(
        mask[:,:,0],
        cv2.RETR_EXTERNAL,
        cv2.CHAIN_APPROX_SIMPLE
    )
    cv2.drawContours(new_mask, contours, -1, (255, 255, 255), 5)
    output = np.where(new_mask==np.array([255, 255, 255]), blur_image, image)
    return output
?

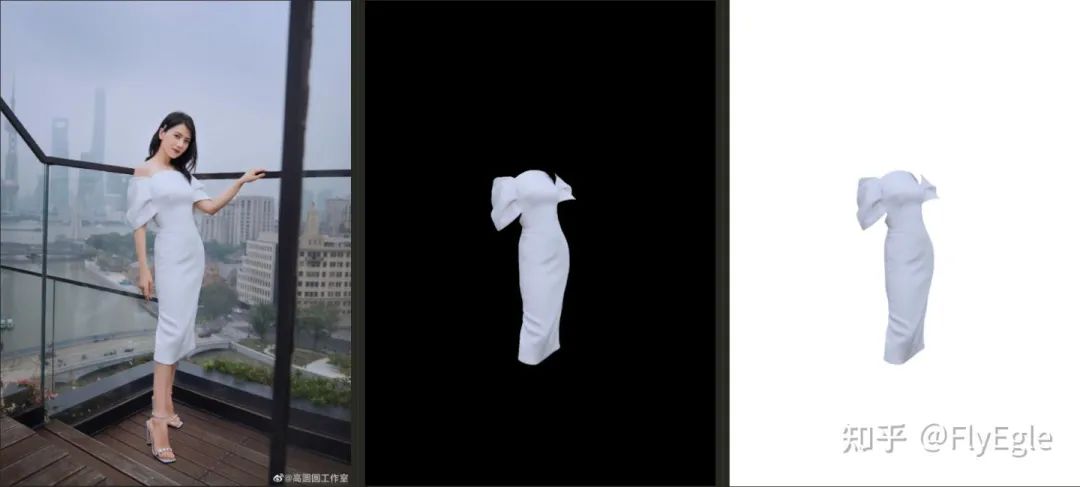
邊緣 其實可以看到,邊緣只是blur了,但是貼到白背景上可以發現視覺效果會好很多,這也是欺騙人眼的一個方法。 放一張高圓圓的照片吧,看一下分割后的結果
07 ? ? ? 代碼
這套代碼框架寫了個把個月,包括了FCNs,SegNets,DeepLab,UNet,U2Net,HRNet等一些常用模型的實現,loss,aug,lrshedule等,以及VOC上的一些pretrain。整體代碼簡單明了,模塊分明,如果有需要后面可以考慮開源。
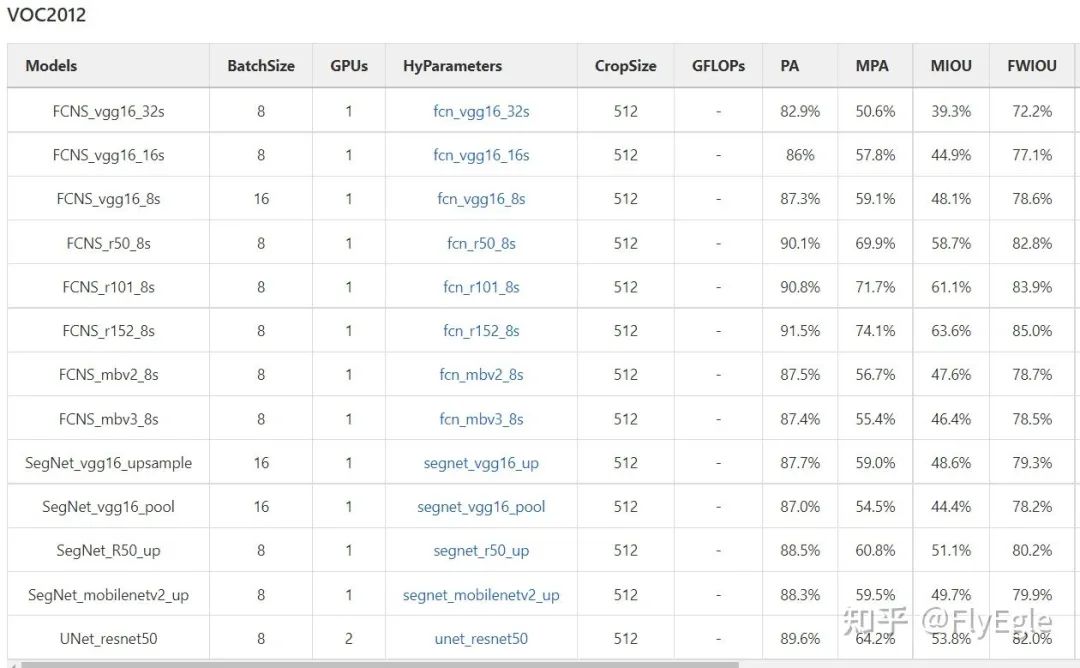
model zoo 最后 ,本人不是主要做分割的,只是項目需要了就寫了一套代碼框架,做了一些相關的實驗探索,有一定的場景調優,不一定具備共性,歡迎大家討論~
編輯:黃飛
?


 工商網監
工商網監
評論