 HarmonyOS Next V2 @Monitor 和@Computed

HarmonyOS Next V2 @Monitor 和@Computed
@Monitor 介紹
@Monitor 是狀態把管理 V2 版本中的用于監聽狀態變量修改的技術。
它可以直接用在
@ComponentV2裝飾的自定義組件中,用于被@Local、@Param、@Provider、@Comsumer、@Computed修飾的狀態變量中- 對于深層次的數據,如深層次對象、對象數組等,需要搭配
@ObservedV2、@Trace一起使用。 - 可以同時監聽多個屬性
- 可以獲取到監聽屬性的修改前后的數據變化
對比狀態管理 V1 中的@Watch
@Monitor 比 @Watch功能要強大不少
@Watch不能用在@ComponentV2修飾的@Watch不具備深度監聽的功能@Watch無法同時監聽多個屬性@Watch無法檢測 屬性修改前后的變化
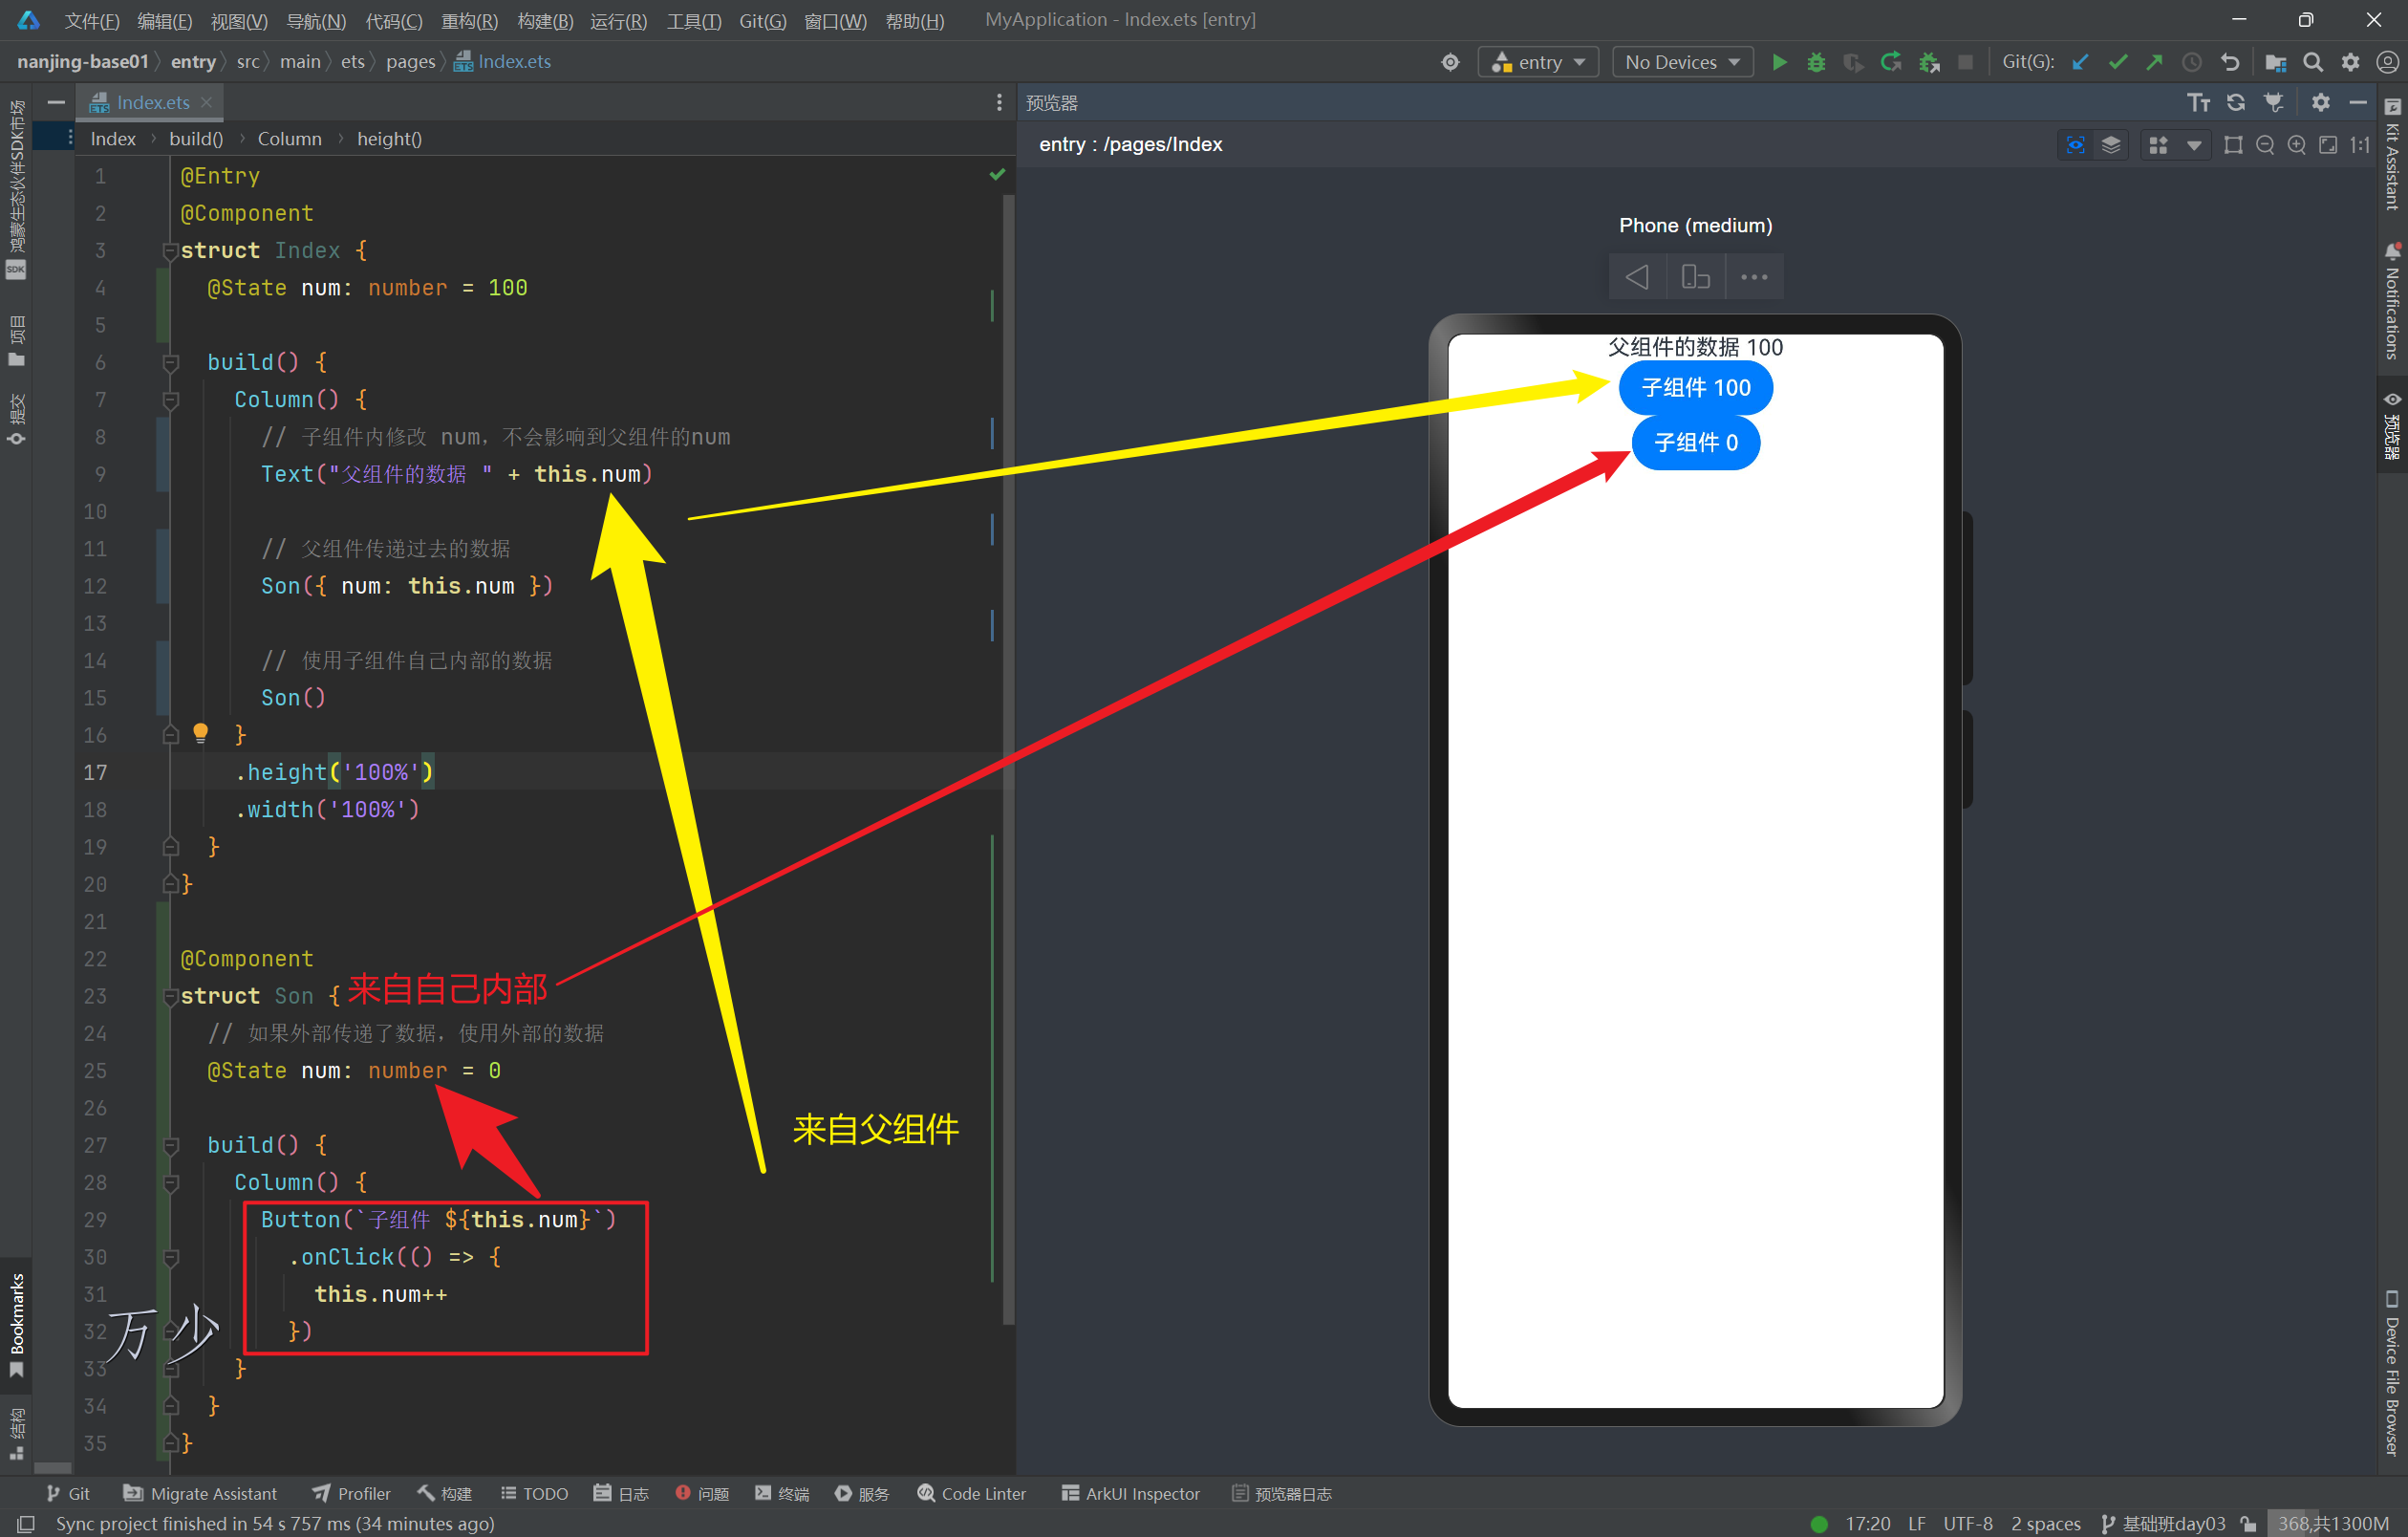
@Monitor 監聽單個屬性
@Entry
@ComponentV2
struct Index {
  @Local num: number = 100

  @Monitor("num")
  changeNum() {
    console.log("檢測到數據的修改啦")
  }

  build() {
    Column() {

      Button(`點擊修改 ${this.num}`)
        .onClick(() = > {
          this.num++
        })
    }
    .width("100%")
    .height("100%")
  }
}
@Monitor 同時監聽多個屬性
@Entry
@ComponentV2
struct Index {
  @Local num: number = 100
  @Local age: number = 200

  // 同時監聽多個狀態的修改
  @Monitor("num","age")
  changeNum() {
    console.log("檢測到數據的修改啦")
  }

  build() {
    Column() {
      Button(`點擊修改 num ${this.num}`)
        .onClick(() = > {
          this.num++
        })
      Button(`點擊修改 age ${this.age}`)
        .onClick(() = > {
          this.age++
        })
    }
    .width("100%")
    .height("100%")
  }
}
@Monitor 的回調函數
@Monitor 的回調函數可以給我們提供這樣的能力:
- 如果監聽了多個狀態,而只有一個狀態發生變化時, 可以給獲知到具體哪個狀態發生了變化
- 當狀態發生變化時,可以獲取到變化前后的兩個值
@Monitor 的回調函數的參數是 [IMonitor],它是一個對象,擁有兩個屬性
dirty,是一個字符串數組,里面存放了修改的狀態的名稱value,是一個函數,調用返回會返回一個新的對象,新對象中包含了path:修改的狀態的名稱,before:修改前的數據,now:修改后的數據,另外value()調用時,如果不傳遞參數并且你是同時修改多個狀態的話,那么它只會返回第一個狀態,如果傳遞了參數-狀態變量 那么就會返回該狀態變量的相關信息
@Entry
@ComponentV2
struct Index {
  @Local num: number = 100
  @Local age: number = 200

  // 同時監聽多個狀態的修改
  @Monitor("num","age")
  changeNum(Monitor: IMonitor) {
    console.log("修改的狀態", Monitor.dirty)
    console.log("Monitor.value()", JSON.stringify(Monitor.value("age")))

  }

  build() {
    Column() {
      Button(`同時修改 num 和 age ${this.num}  ${this.age}`)
        .onClick(() = > {
          this.num++
          this.age++
        })

    }
    .width("100%")
    .height("100%")
  }
}
@Monitor 深度監聽
@Monitor 需要和 @ObservedV2、@Trace一起使用才能實現深度監聽的效果,需要注意的是:
@Monitor可以直接寫在@ObserveV2修飾的class中@Monitor也可以寫在正常的組件內
@ObservedV2
class Person {
  @Trace son: Son = new Son()
}

@ObservedV2
class Son {
  // @Monitor可以直接寫在 @ObserveV2 修飾的class中
  @Monitor("weight")
  weightChange() {
    console.log("1 兒子的體重修改了")
  }

  @Trace weight: number = 200
}


@Entry
@ComponentV2
struct Index {
  person: Person = new Person()
    // @Monitor 也可以寫在正常的組件內
  @Monitor("person.son.weight")
  weightChange() {
    console.log("2 兒子的體重唄修改了")
  }

  build() {
    Column() {
      Button(`修改兒子的體重${this.person.son.weight}`)
        .onClick(() = > {
          this.person.son.weight++
        })
    }
    .width("100%")
    .height("100%")
  }
}
@Monitor 的限制
在實際開發使用中,@Monitor也存在一些限制,無法監聽內置類型(Array、Map、Date、Set)的 API 調用引起的變化,如當你檢測整個數組時,你對數組使用 push、splice等常見方法修改數組,是無法檢測到的。當然,當整個數組被重新賦值時,可以檢測到它的變化
@ObservedV2
class Person {
  @Trace name: string = "小明"
}


@Entry
@ComponentV2
struct Index {
  @Local
  personList: Person[] = [new Person()]

  @Monitor("personList")
  weightChange() {
    console.log(" 檢測到數組修改了")
  }

  build() {
    Column() {
      Button("增加一個")
        .onClick(() = > {
          // 1 無效 - 無法檢測到數組發生了修改
          this.personList.push(new Person())


          // 2 有效 檢測到了數組發生修改
          // const newPerson = [...this.personList, new Person()]
          // this.personList = newPerson
        })
      ForEach(this.personList, (item: Person) = > {
        Text(item.name)
      })
    }
    .width("100%")
    .height("100%")
  }
}
另外可以通過.語法或者監聽數組長度來變向實現檢測數組元素發生變化
.語法
@ObservedV2
class Person {
  @Trace name: string = "小明"
}


@Entry
@ComponentV2
struct Index {
  @Local
  personList: Person[] = [new Person()]

  @Monitor("personList.0")
  // 如果要單獨監聽對象中的某個屬性  @Monitor("personList.0.name")
  weightChange() {
    console.log(" 檢測到數組修改了")
  }

  build() {
    Column() {
      Button("增加一個")
        .onClick(() = > {
          const p = new Person()
          p.name = "小黑"
          this.personList[0] = p
        })
      ForEach(this.personList, (item: Person) = > {
        Text(item.name)
      })
    }
    .width("100%")
    .height("100%")
  }
}
監聽數組長度變化
@ObservedV2
class Person {
  @Trace name: string = "小明"
}


@Entry
@ComponentV2
struct Index {
  @Local
  personList: Person[] = [new Person()]

  @Monitor("personList.length")
  weightChange() {
    console.log(" 檢測到數組修改了")
  }

  build() {
    Column() {
      Button("增加一個")
        .onClick(() = > {
          const p = new Person()
          p.name = "小黑"
          this.personList.push(p)
        })
      ForEach(this.personList, (item: Person) = > {
        Text(item.name)
      })
    }
    .width("100%")
    .height("100%")
  }
}
@Computed
@Computed為計算屬性,可以監聽數據變化,從而計算新的值。用法比較簡單
@Entry
@ComponentV2
struct Index {
  @Local num: number = 100

  @Computed
  get numText() {
    return this.num * 2
  }

  build() {
    Column() {
      Button("修改")
        .onClick(() = > {
          this.num++
        })
      Text(`原數據 ${this.num}`)
      Text(`計算后 ${this.numText}`)
    }
    .width("100%")
    .height("100%")
  }
}
審核編輯 黃宇
聲明:本文內容及配圖由入駐作者撰寫或者入駐合作網站授權轉載。文章觀點僅代表作者本人,不代表電子發燒友網立場。文章及其配圖僅供工程師學習之用,如有內容侵權或者其他違規問題,請聯系本站處理。
舉報投訴
-
HarmonyOS
+關注
關注
80文章
2118瀏覽量
32806
發布評論請先 登錄
相關推薦
熱點推薦
第三屆大會回顧第2期 | HarmonyOS NEXT內核驅動生態兼容與競爭力思考
隨著HarmonyOS NEXT生態和技術的發展,驅動框架作為北向和南向的生態中樞,有很多的機會。例如,提供更多的信息到應用層,實現精準的性能功耗控制;打破傳統的分層解耦,簡化關鍵協議、關鍵路徑等等。
HarmonyOS Next V2 @Local 和@Param
HarmonyOS Next V2 @Local 和@Param @Local 背景 @Local 是 harmony 應用開發中的 v2 版本中 對標**@State**的狀態管理修
HarmonyOS Next V2 @Event
HarmonyOS Next V2 @Event 背景 在上一節中,我們針對父子組件,講了關于傳遞數據的知識。我們了解到 @Local 是管理自己內部的數據的, @Param 是負責接收父組件的數據
在linux使用HUMMINGGBIRD Debugger Kit V2連接目標板上e203提示出錯是怎么回事?
在linux使用HUMMINGGBIRD Debugger Kit V2 連接目標板上e203提示出錯如下:
(hbirdenv) root@linuxczp:/home/nuclei-hbird
發表于 03-07 16:32
微軟OmniParser V2:大模型轉化為計算機智能體
微軟近日宣布,視覺Agent解析框架OmniParser已發布最新版本V2。這一新版本具有將大型語言模型如OpenAI(4o/o1/o3-mini)、DeepSeek(R1)、Qwen(2.5VL

名單公布!【書籍評測活動NO.56】極速探索HarmonyOS NEXT:純血鴻蒙應用開發實踐
本書深入剖析了HarmonyOS NEXT的各項技術,通過豐富的實戰案例,由淺入深地解析了HarmonyOS NEXT的原理與應用。借助多樣化的實戰案例和豐富的配套資源,讀者可以全面
發表于 01-20 16:53
HarmonyOS NEXT 應用開發練習:智能視頻推薦
一、整體思路
本DEMO展示了如何在HarmonyOS NEXT平臺上開發一個智能視頻推薦應用。應用通過模擬的用戶偏好數據,為用戶推薦可能感興趣的視頻。用戶可以通過滑動屏幕查看推薦的視頻列表,并點擊
發表于 01-02 16:26
華為大氣啊!HarmonyOS NEXT公測發福利~這個可以有
HarmonyOS NEXT火熱公測中,首批100萬名公測用戶速來領取多重權益!這波福利不錯

華為HarmonyOS NEXT 10月8日開啟公測
華為宣布,萬眾矚目的HarmonyOS NEXT操作系統將于10月8日正式開啟公測,標志著這一創新力作即將與廣大用戶見面。HarmonyOS NEXT作為華為自研操作系統的最新成果,不

淺析SDIO協議V2和V3版本的區別
SDIO(Secure Digital Input/Output)協議V2和V3在多個方面存在顯著的區別,這些區別主要體現在功能支持、硬件要求、安全性以及支持的協議等方面。以下是對這些區別的詳細分析
發表于 09-18 08:32
華為“純血”鴻蒙系統 HarmonyOS NEXT 將于9月底推出正式版
HarmonyOS NEXT 將于今年 9 月底推出正式版本。 “從發布第一個版本到今年的 9 月份,這個(9 月)月底我們會正式發布 HarmonyOS NEXT,這一版本是完全獨
華為HarmonyOS NEXT鴻蒙星河版正式開啟Beta計劃
在剛剛落幕的華為開發者大會(HDC 2024)盛會上,華為震撼宣布HarmonyOS NEXT鴻蒙星河版正式邁入Beta測試階段,并預告其商用版本將于今年第四季度璀璨登場,預示著今年10月,搭載全新鴻蒙星河系統的華為手機即將與消費者見面。


 工商網監
工商網監
評論